

Home / Metal Wall Art /
Metal Wall Art With Flowers & Architecture
$3,695.00
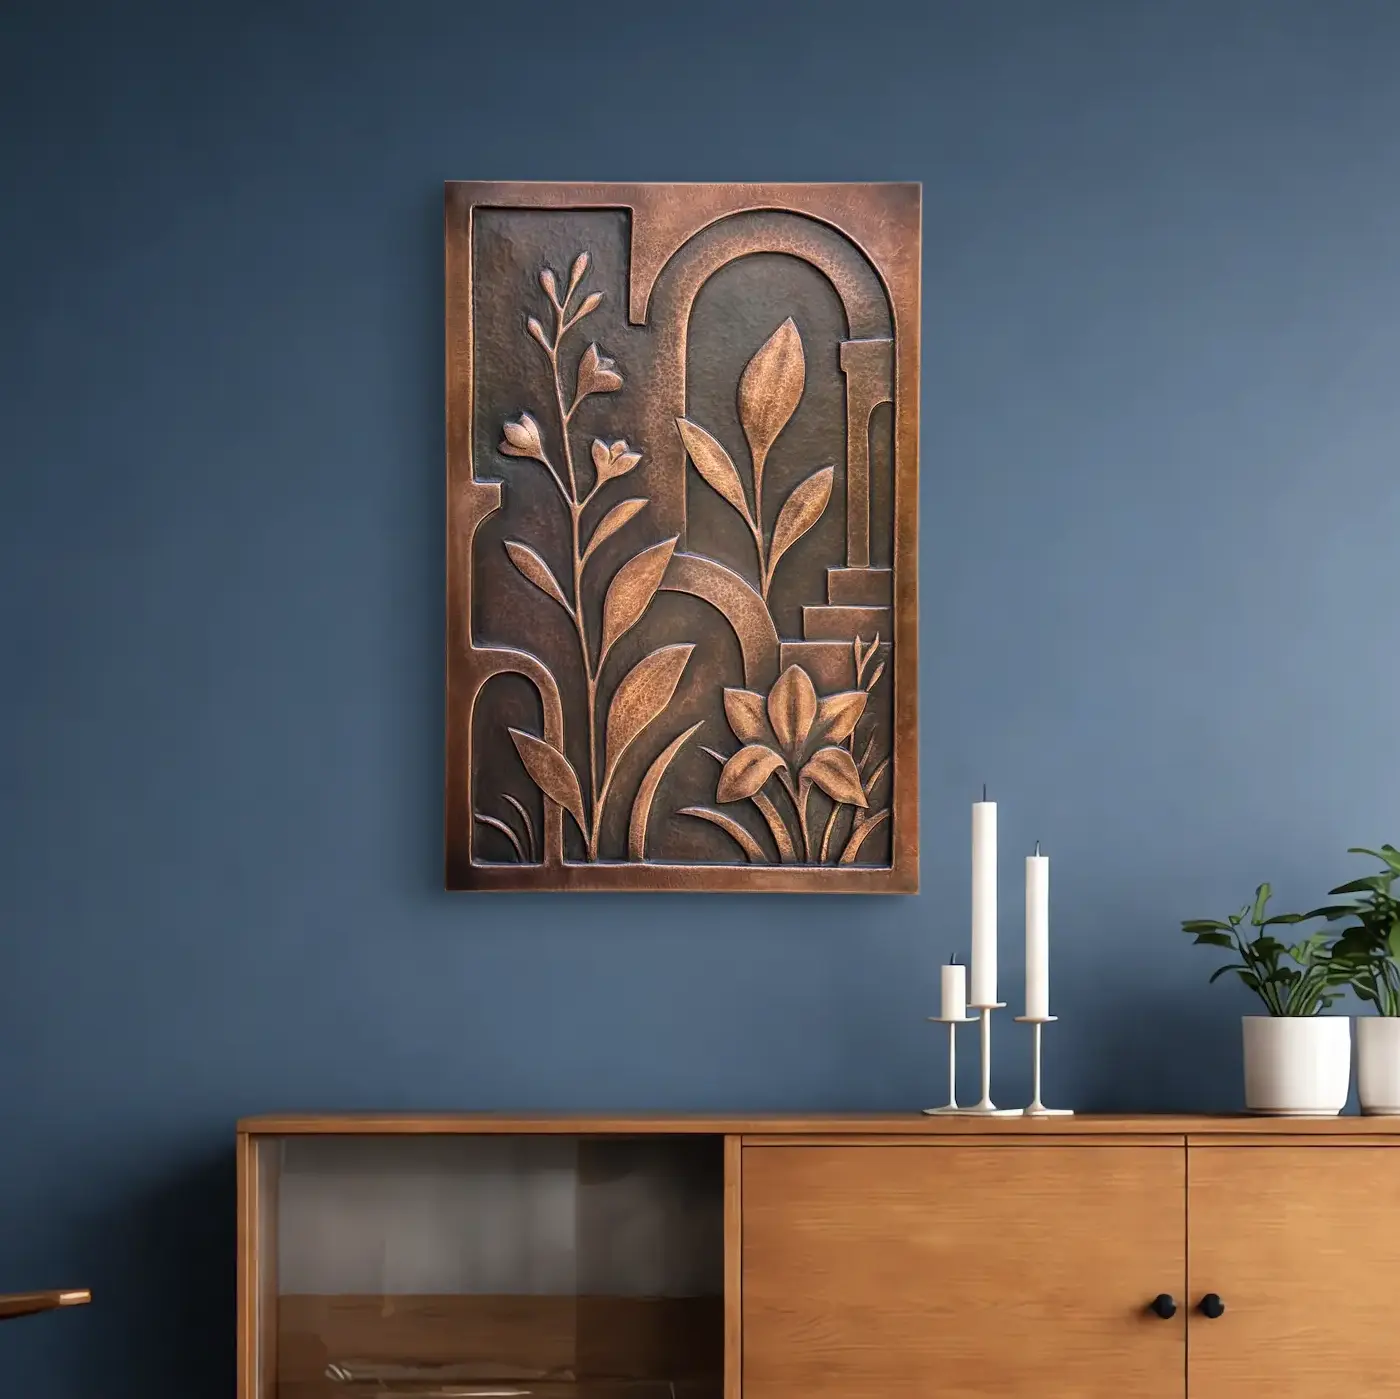
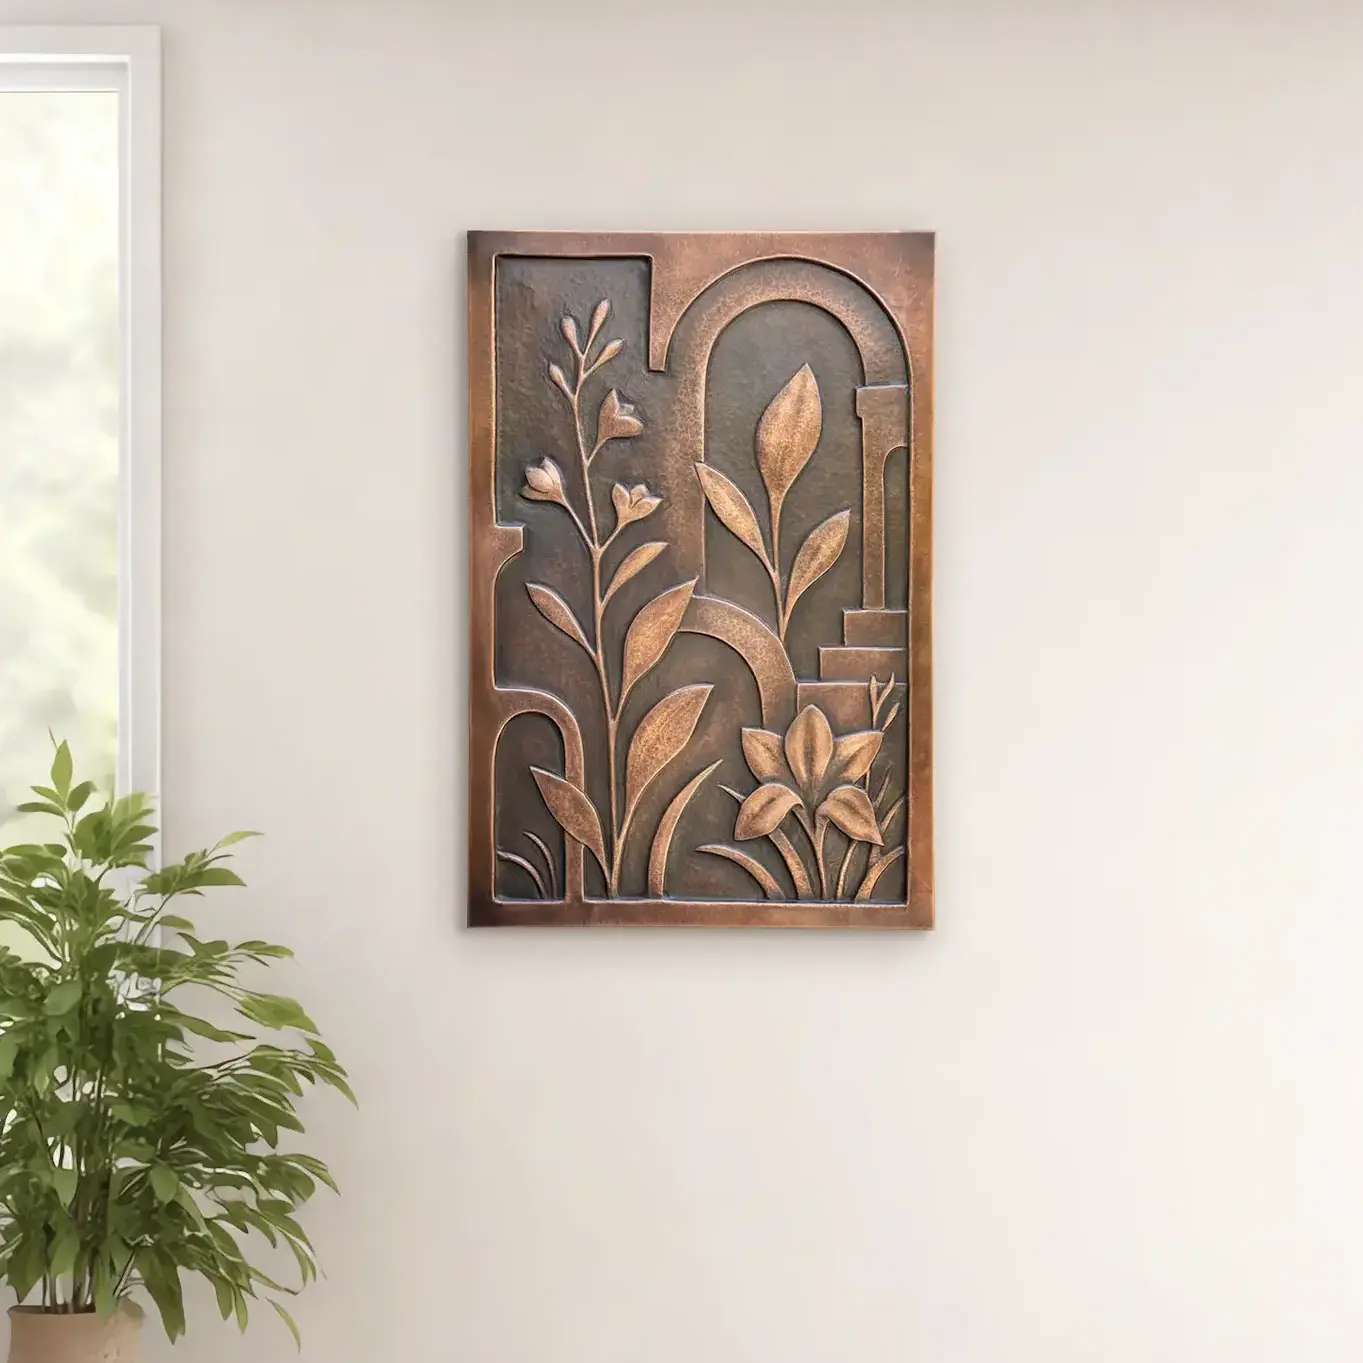
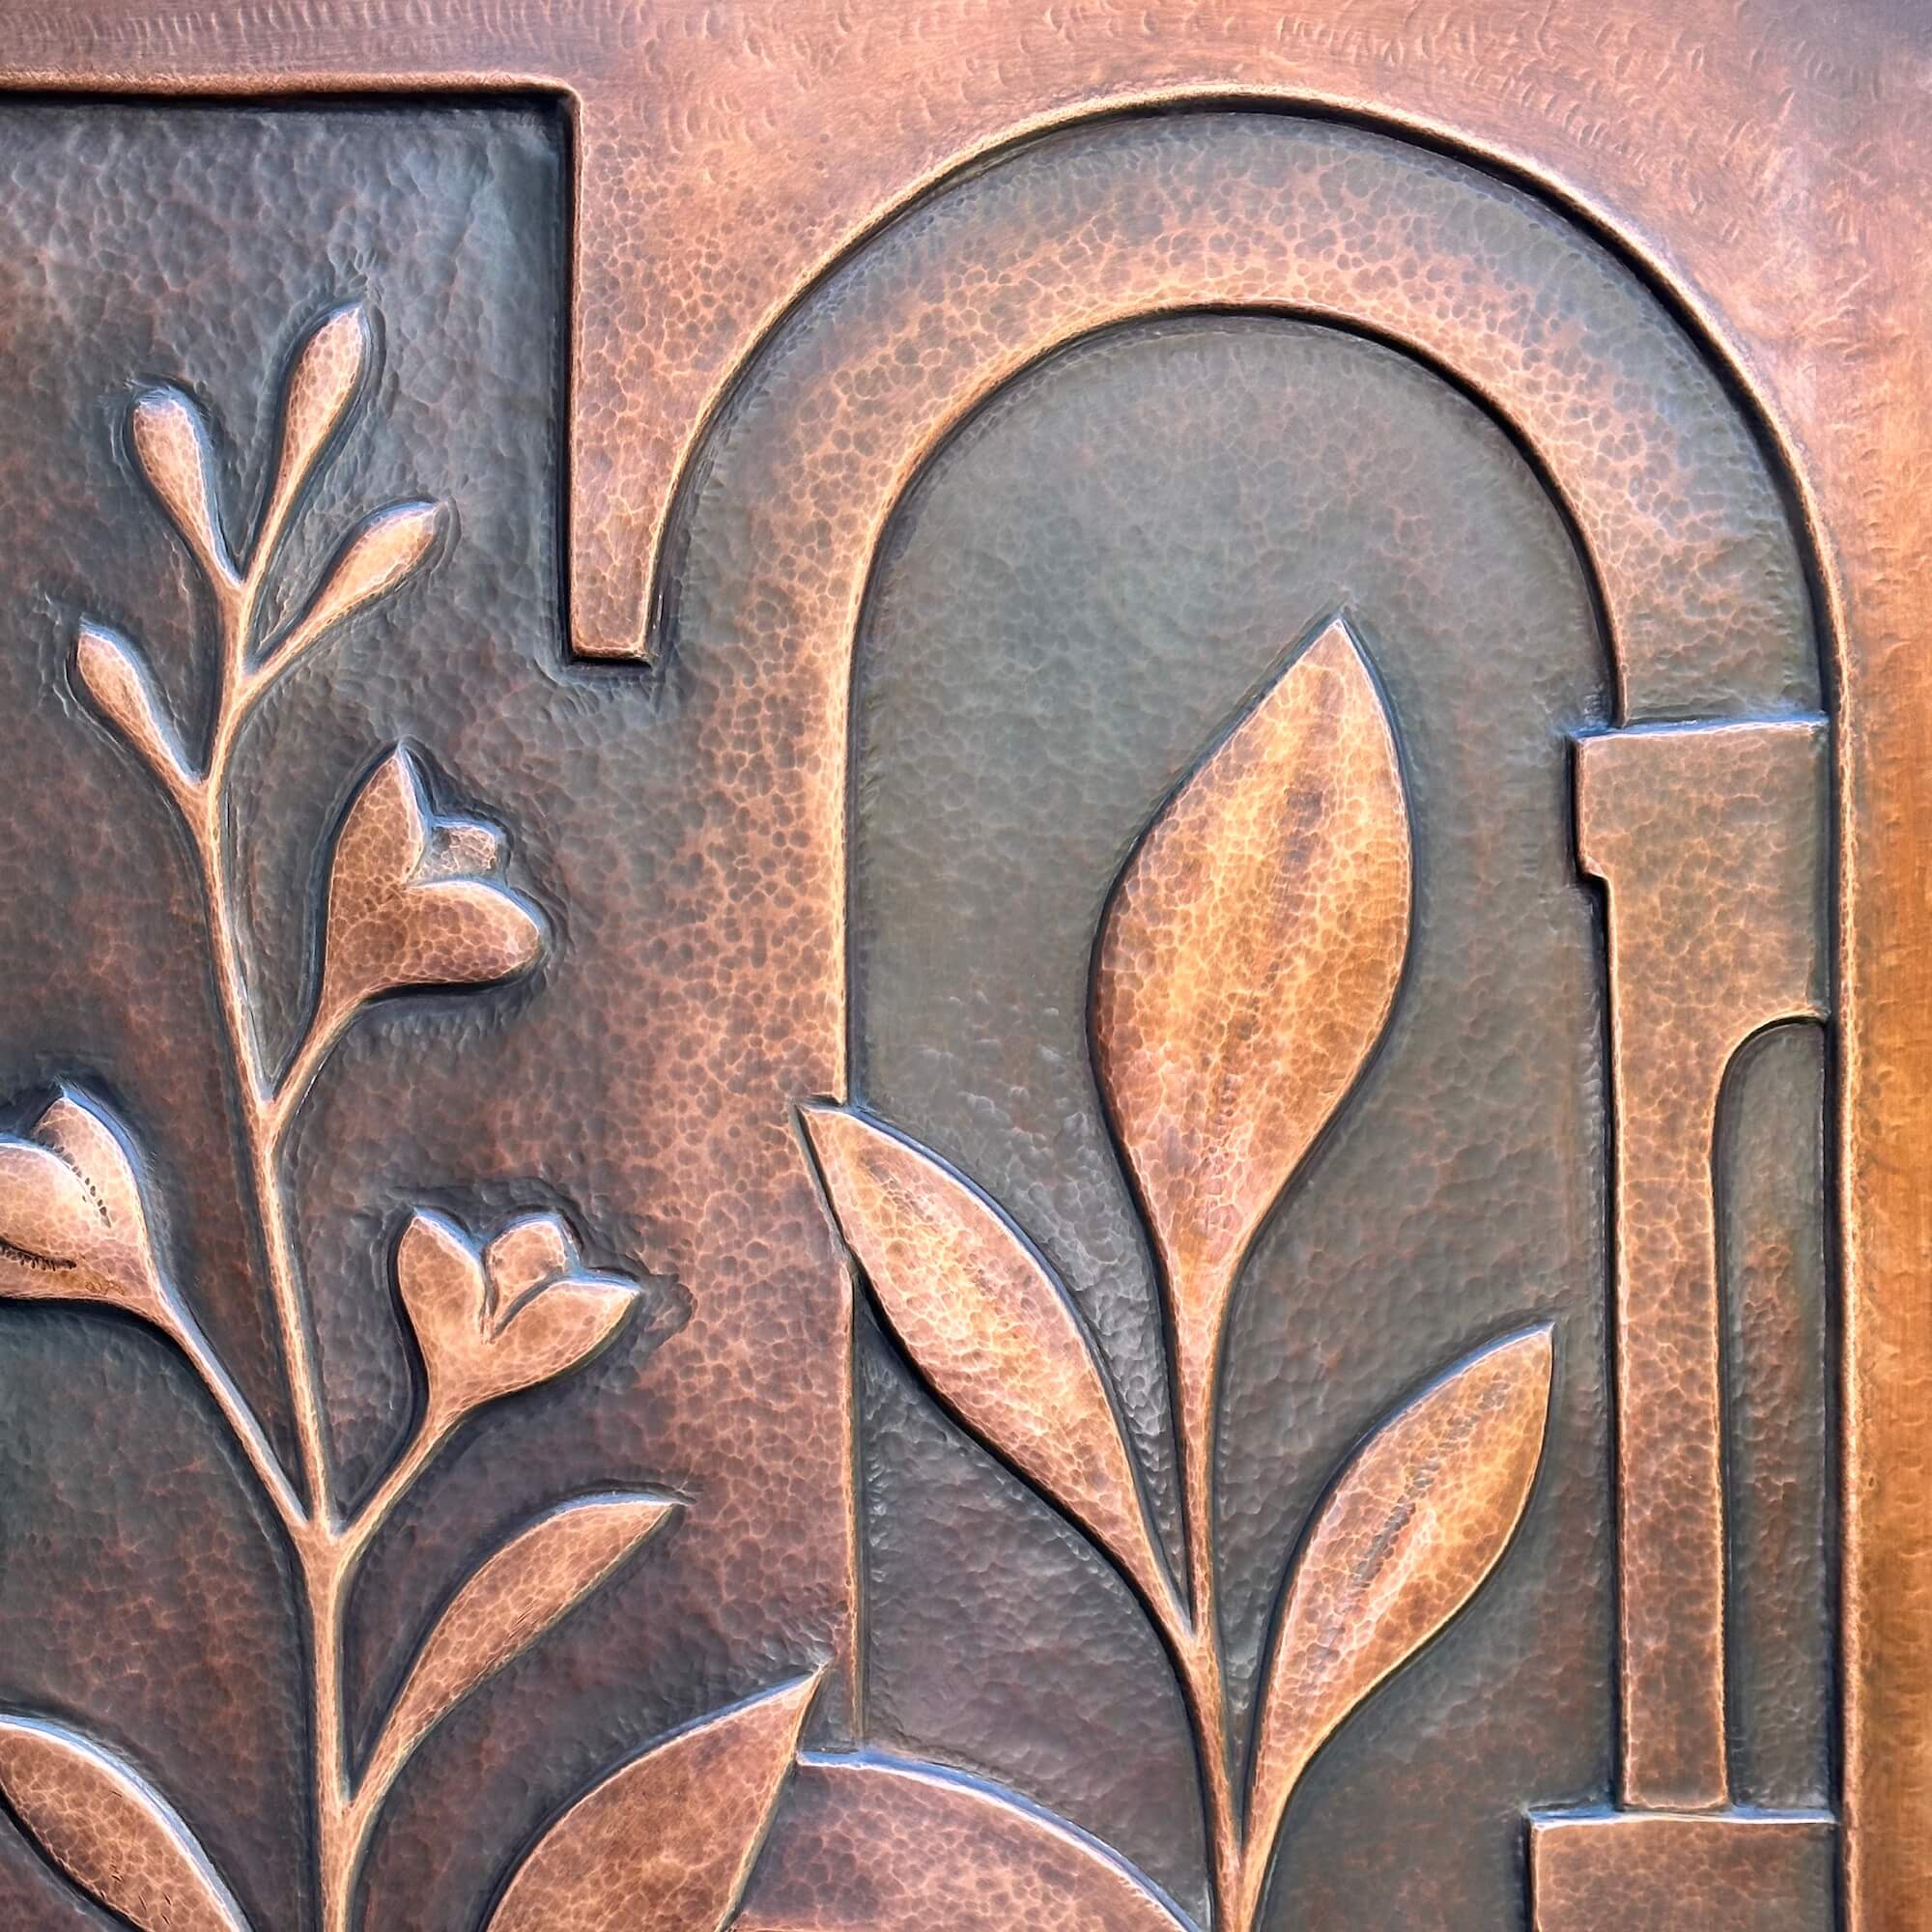
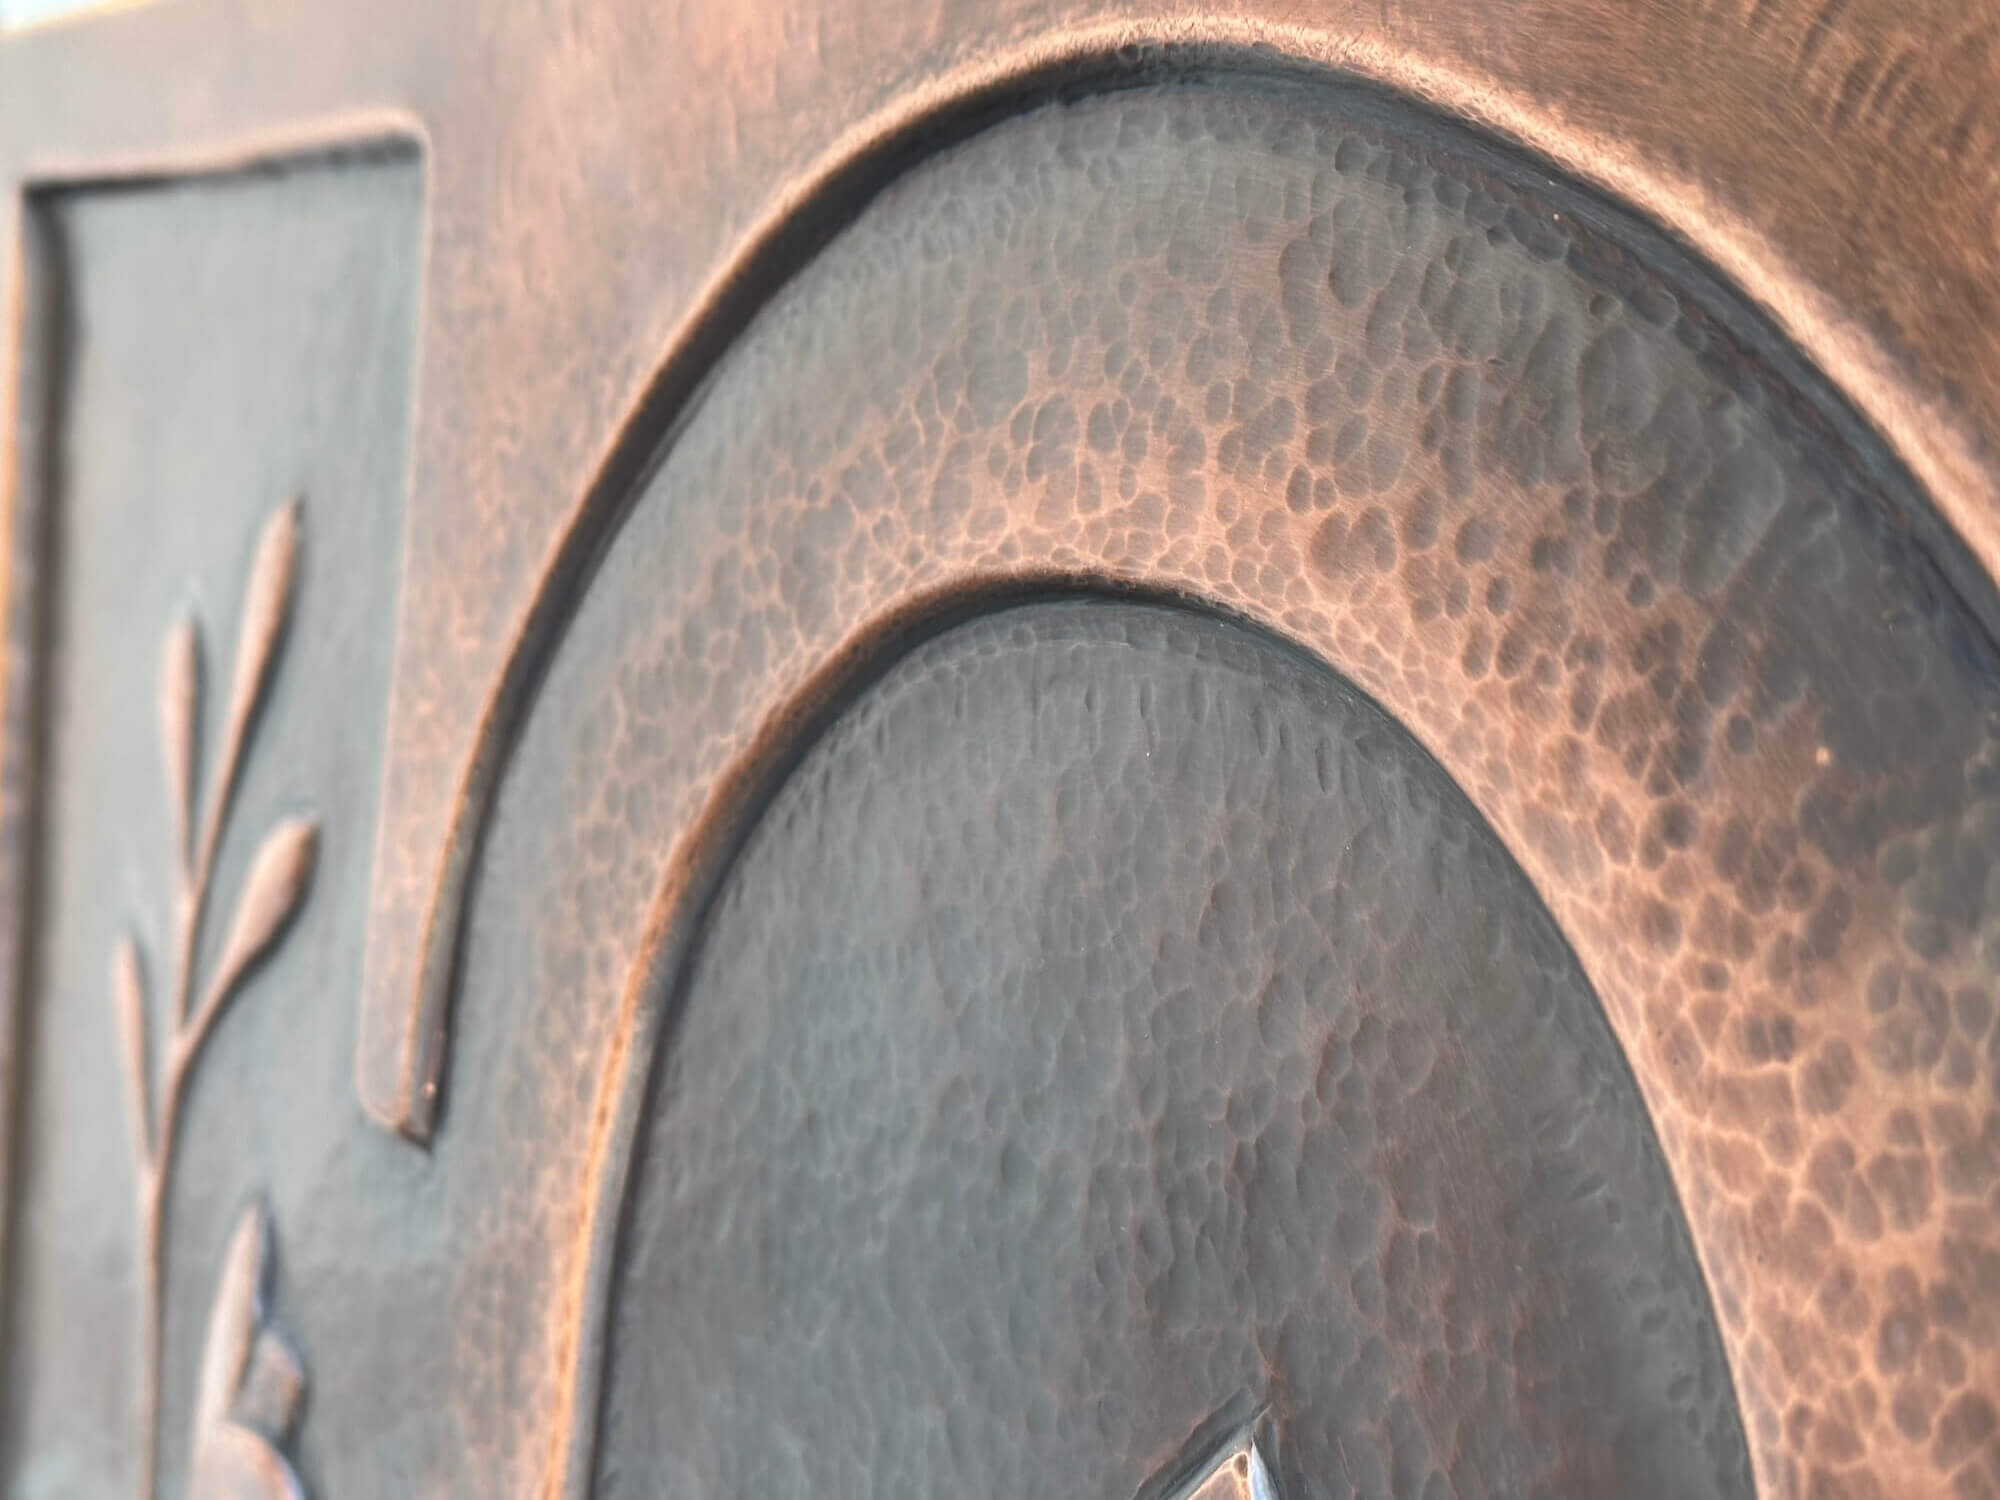
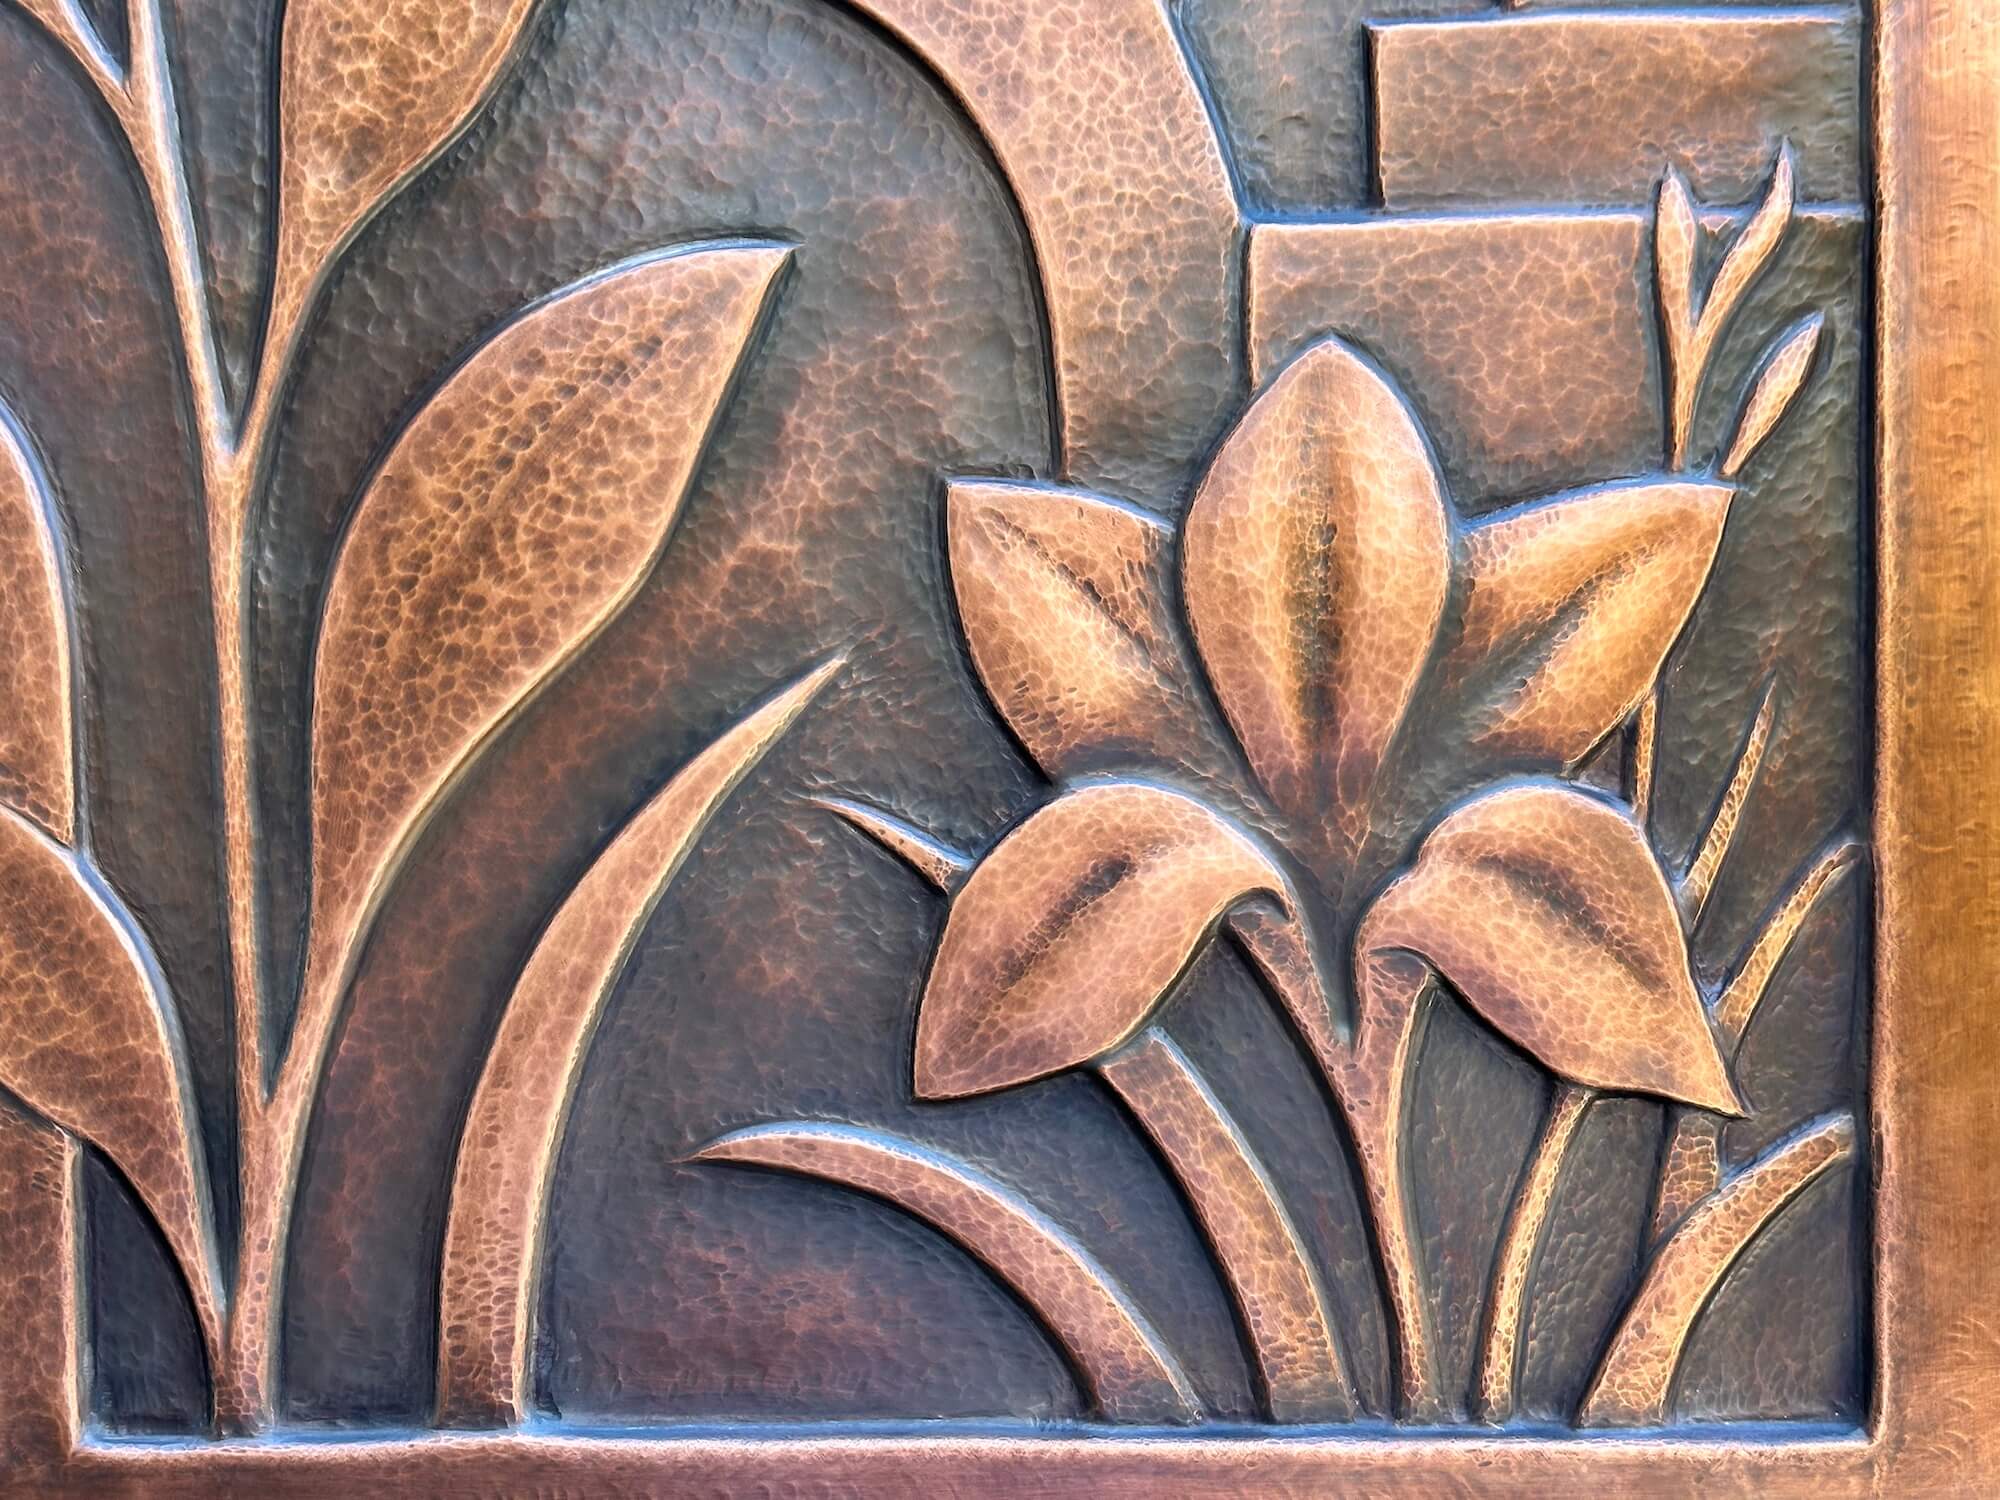
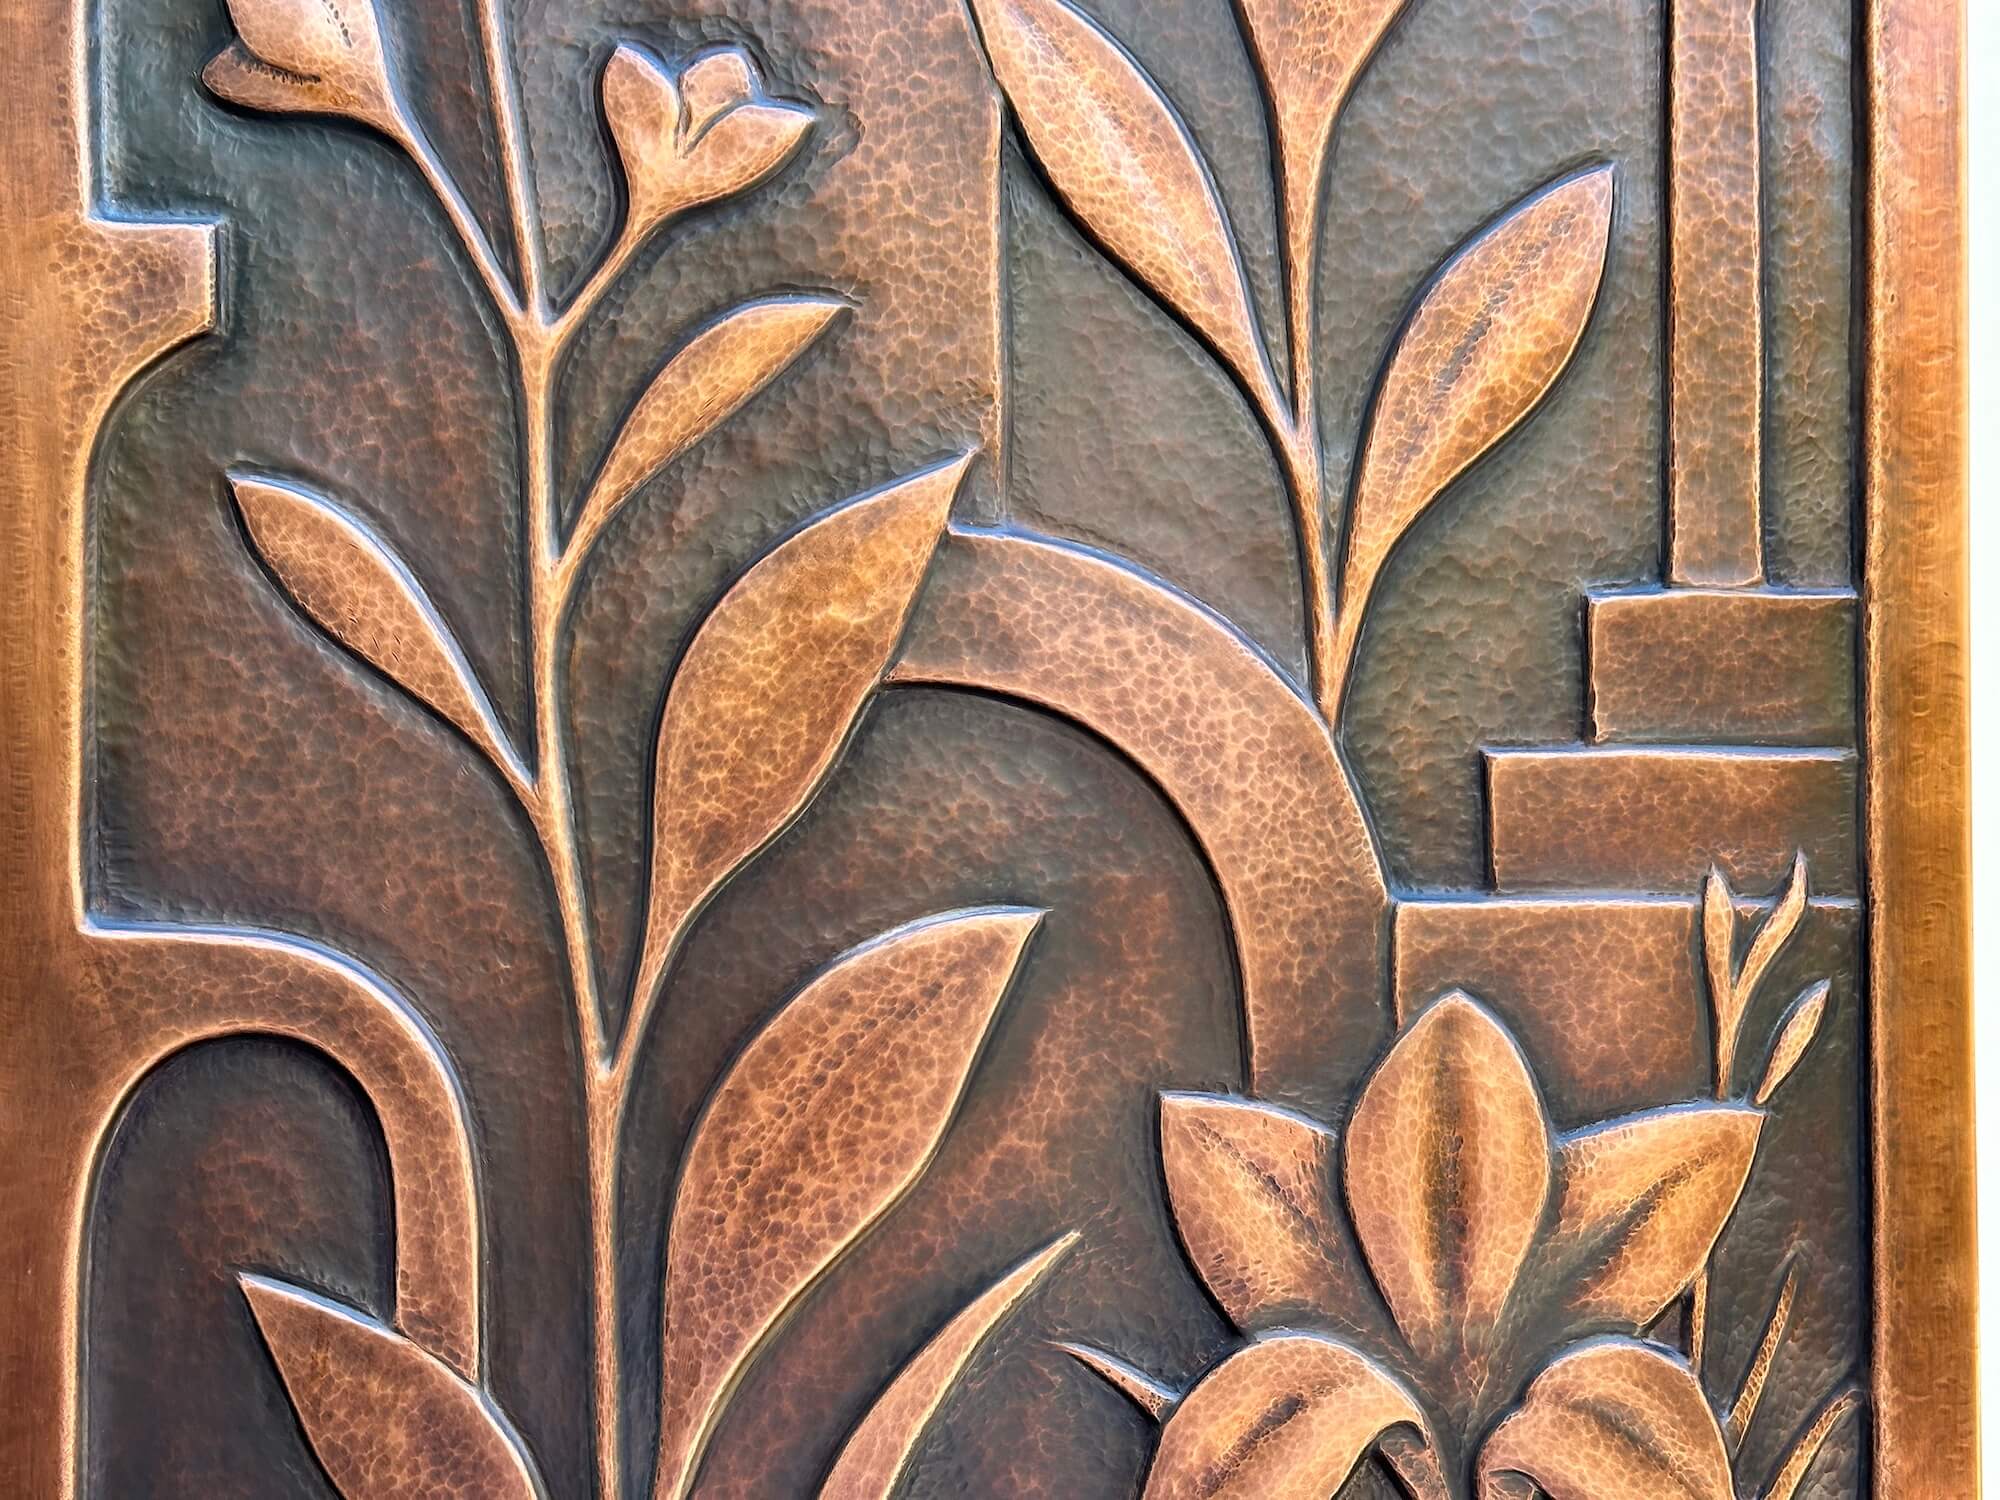
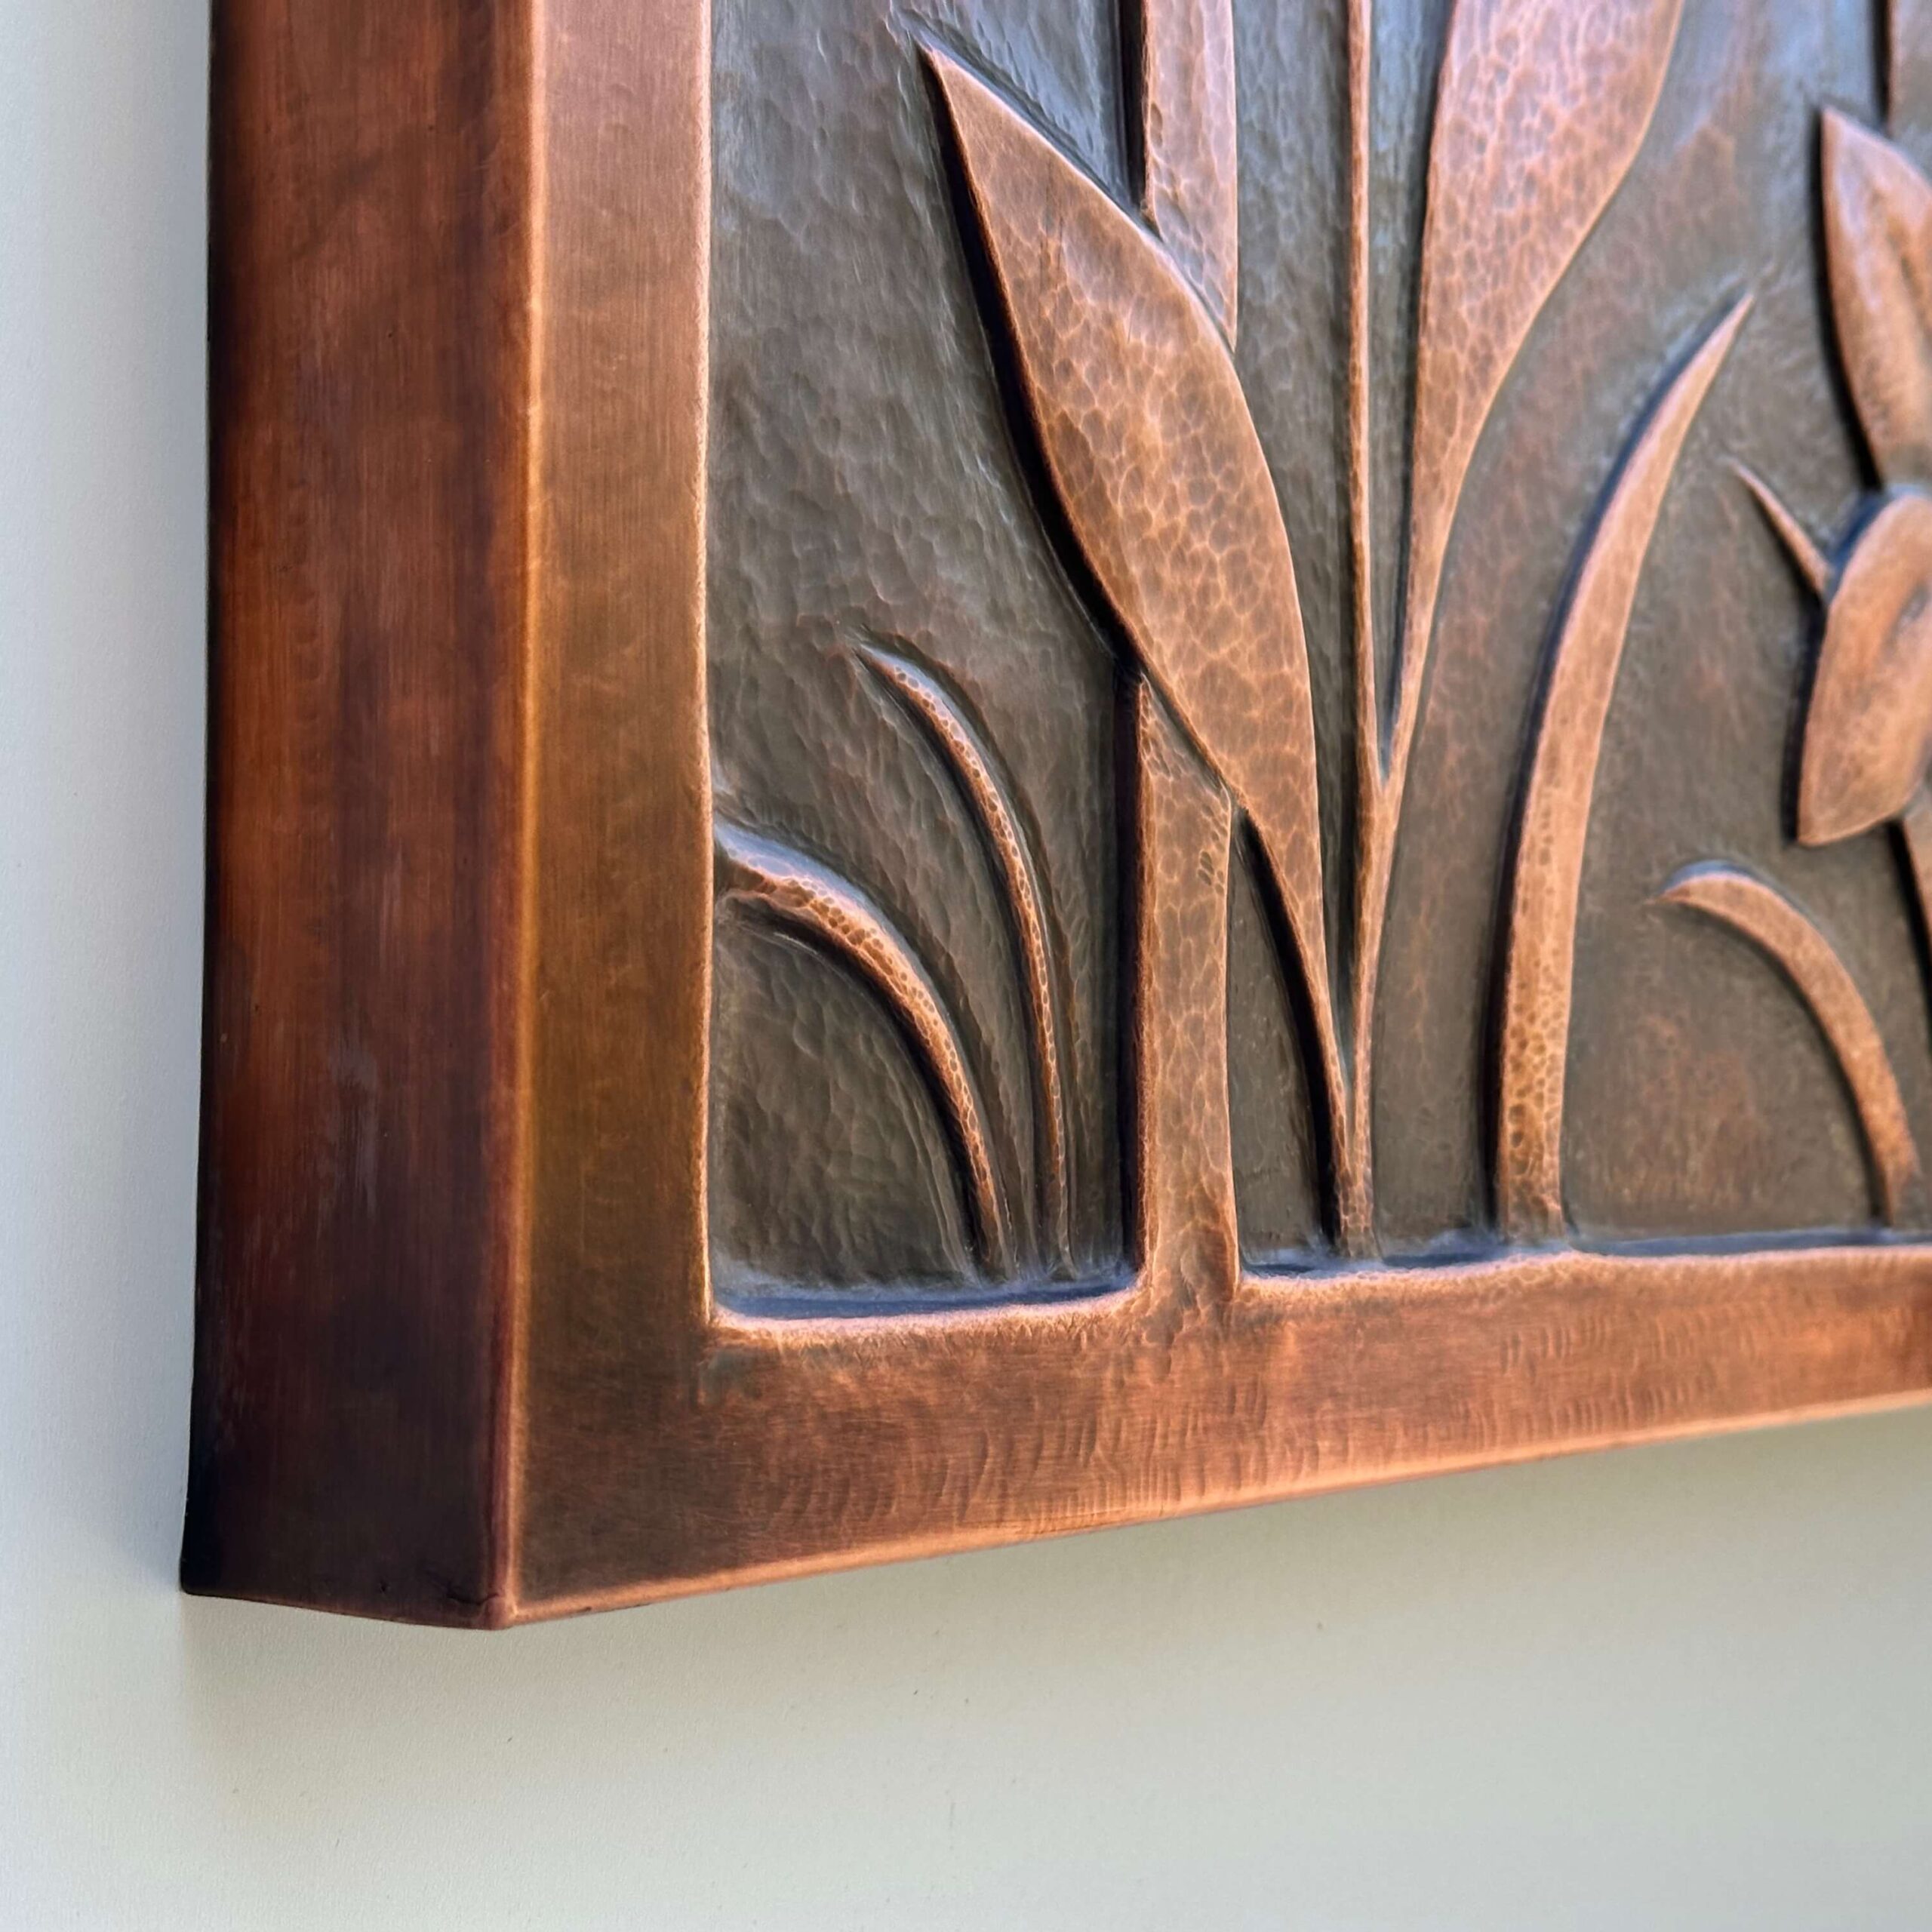
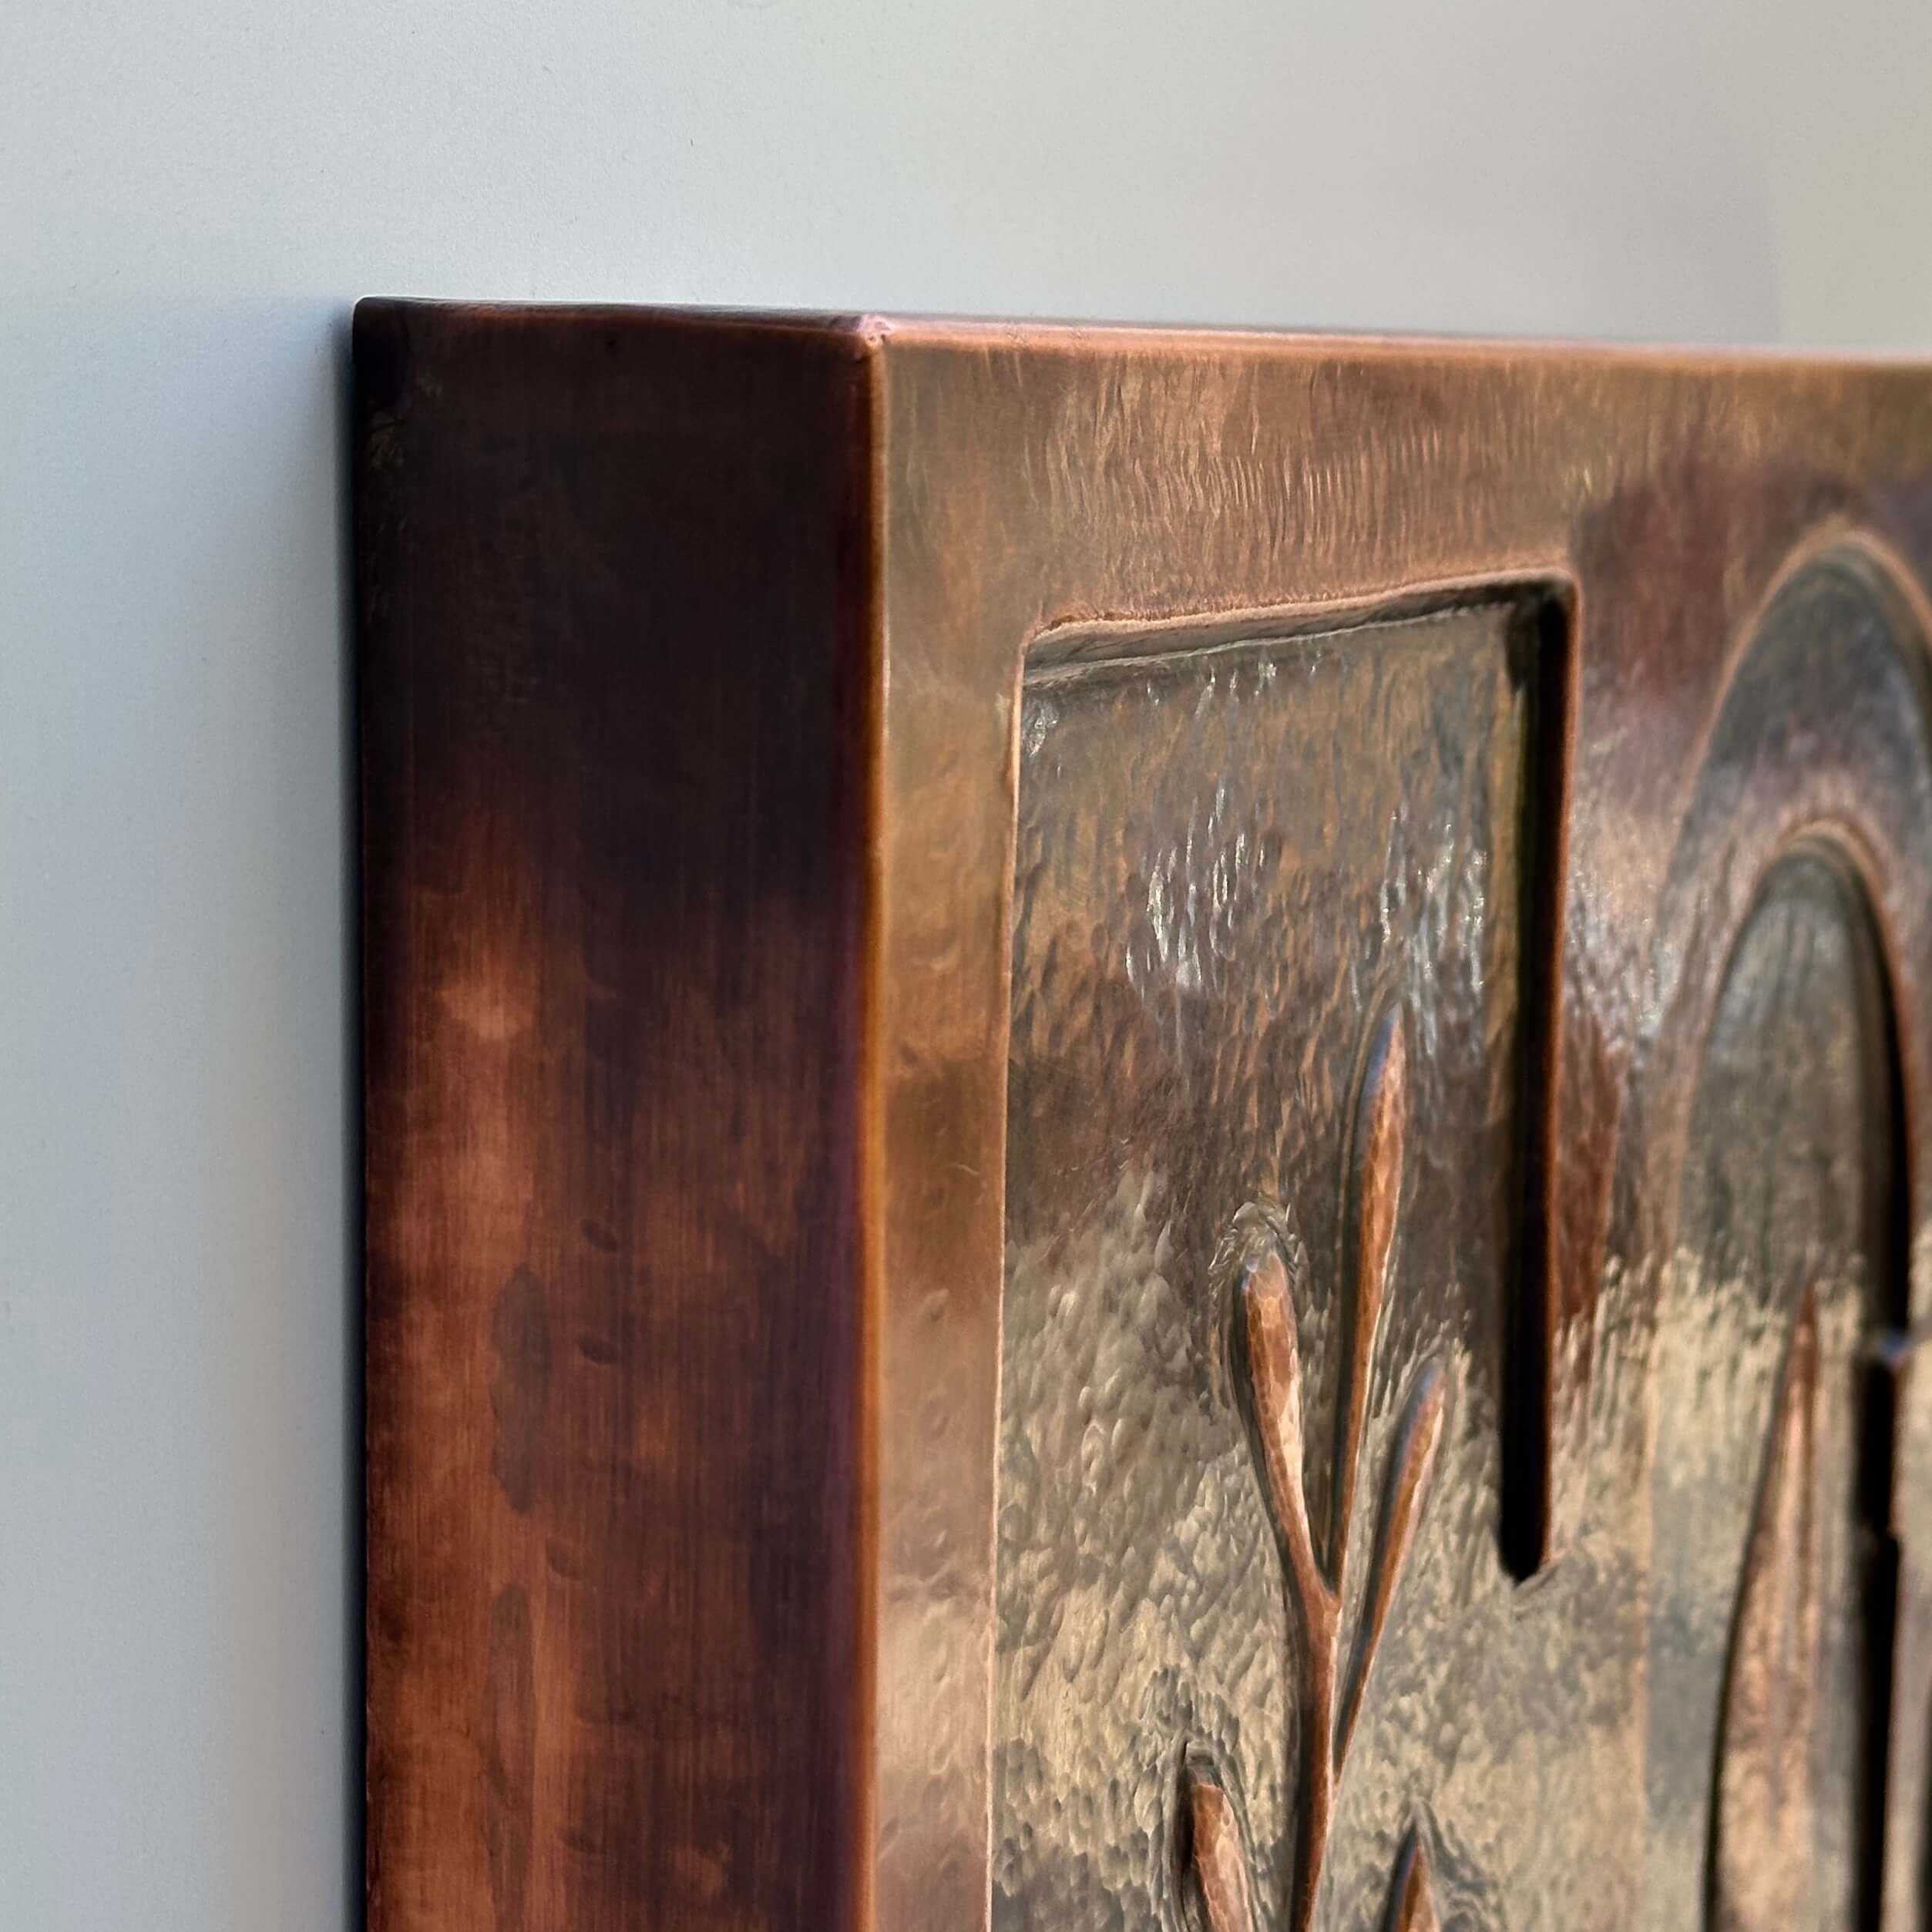
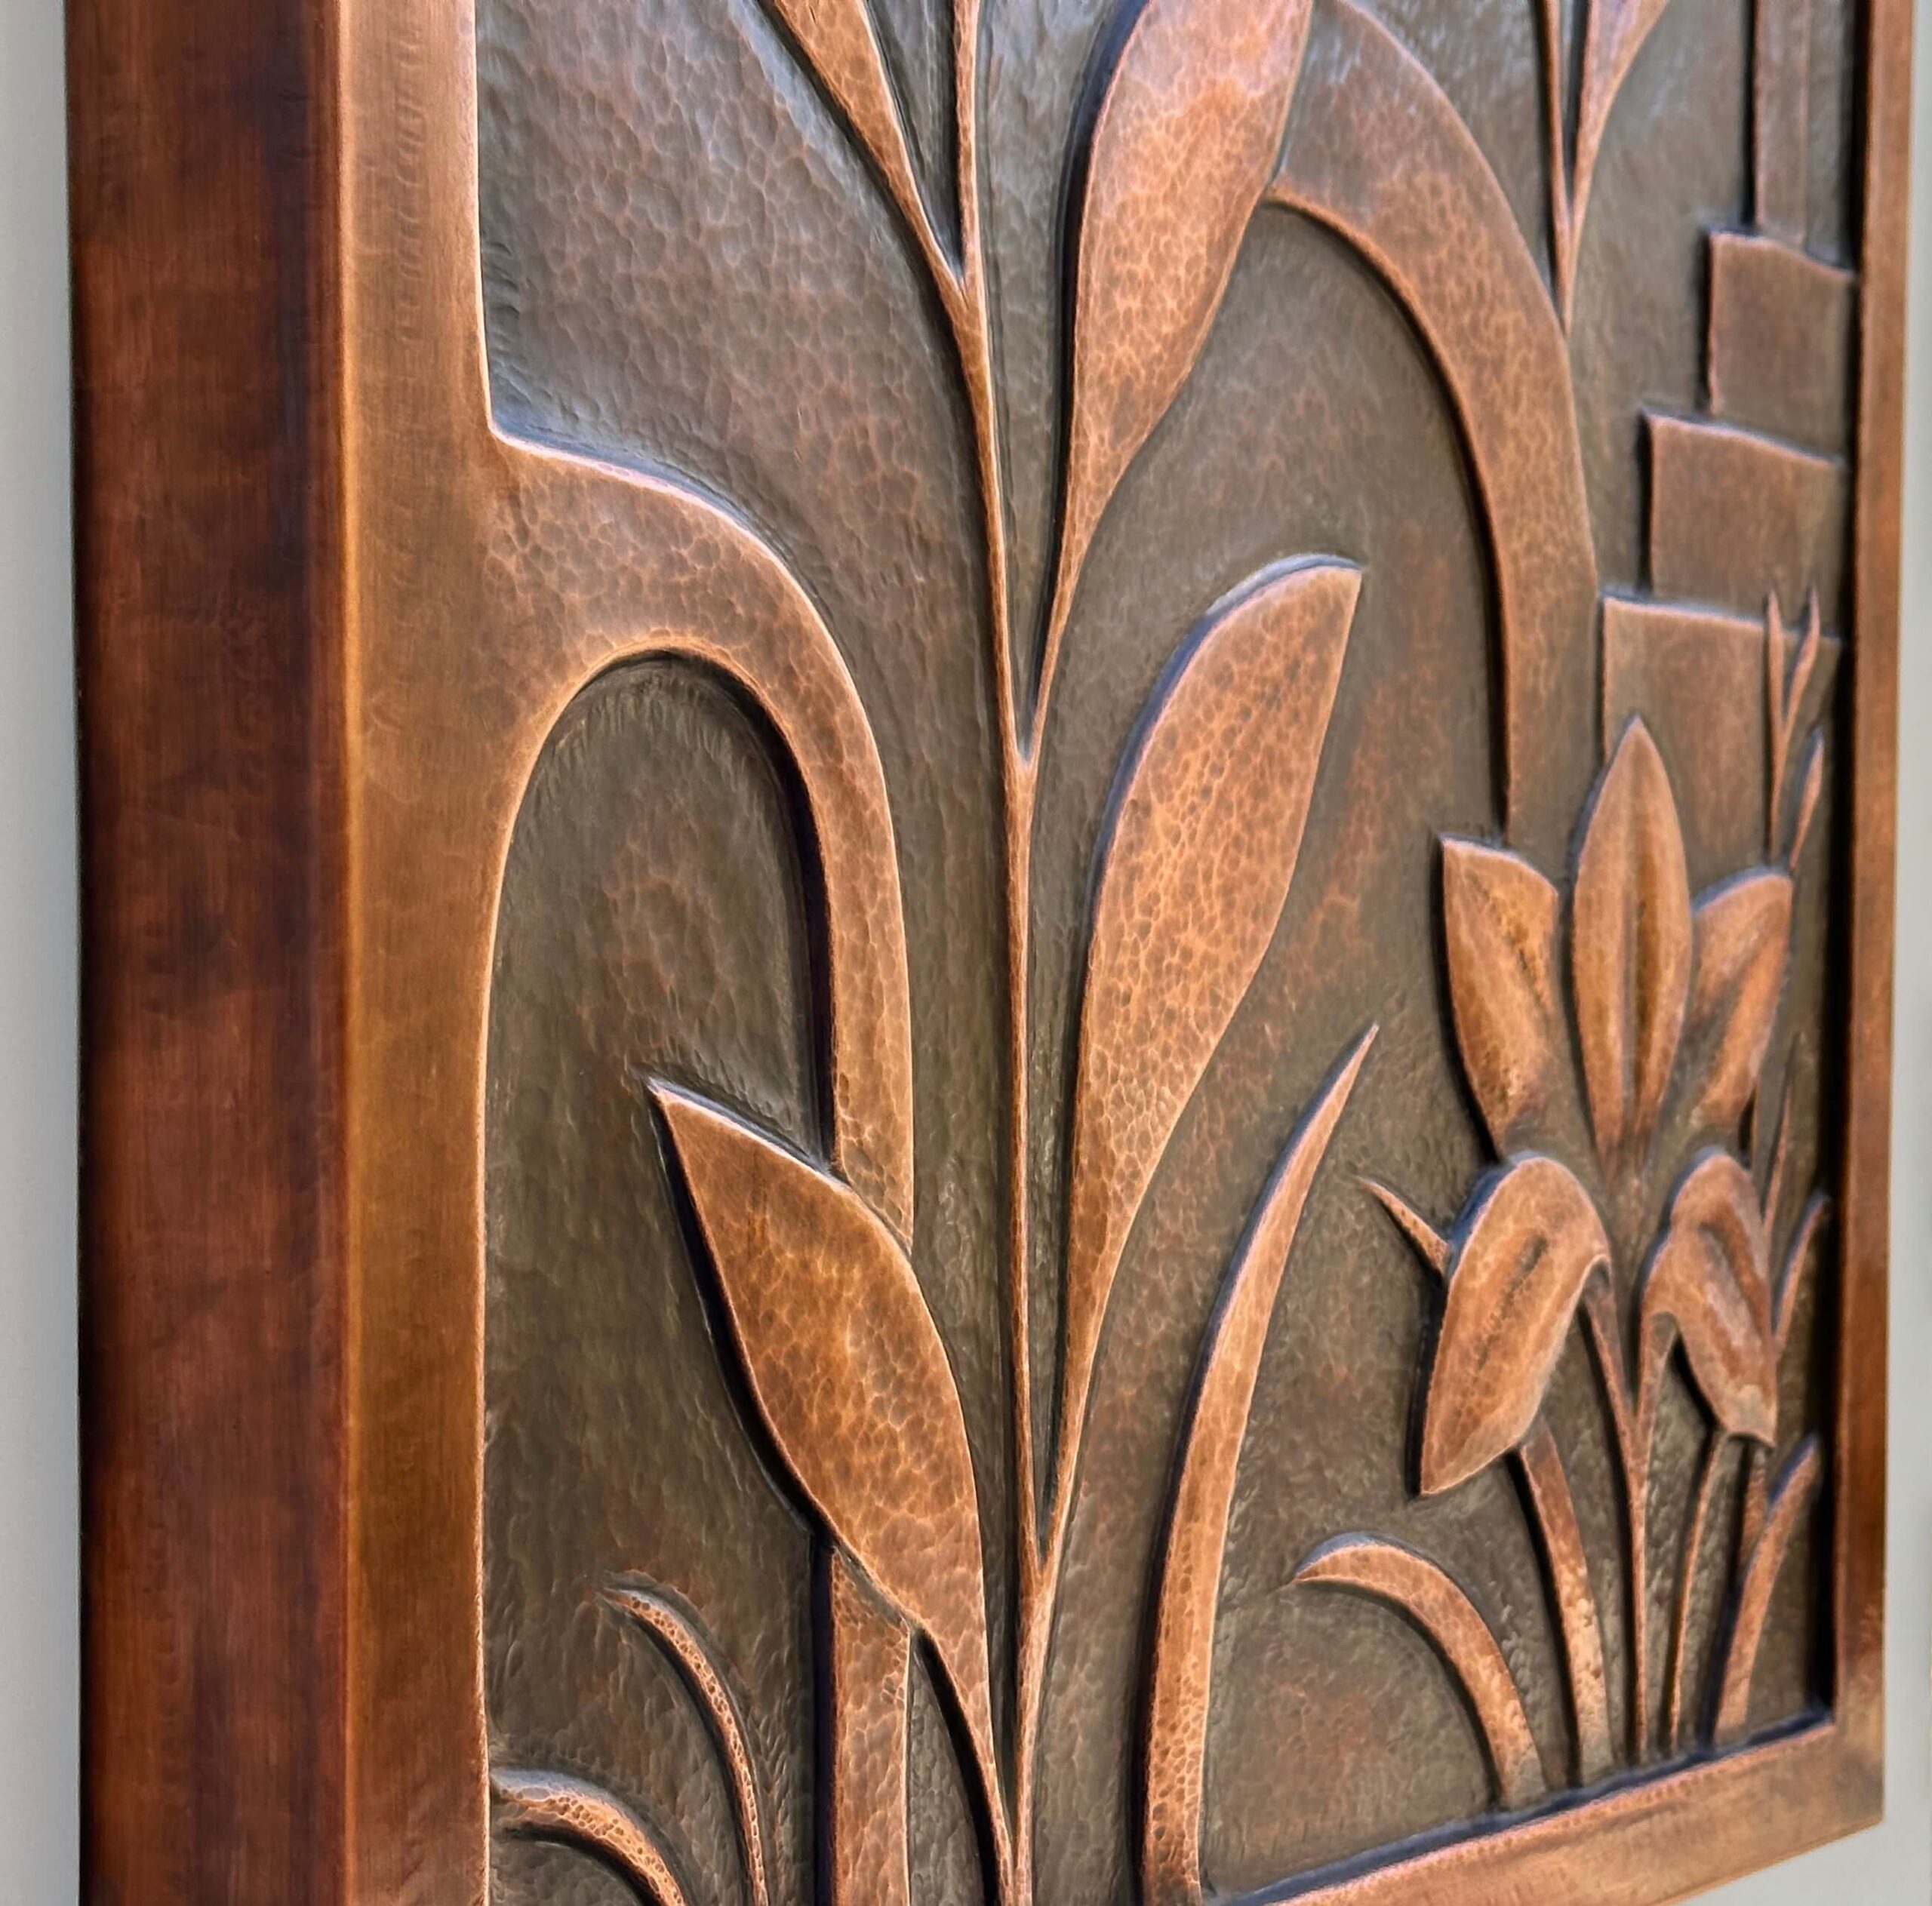
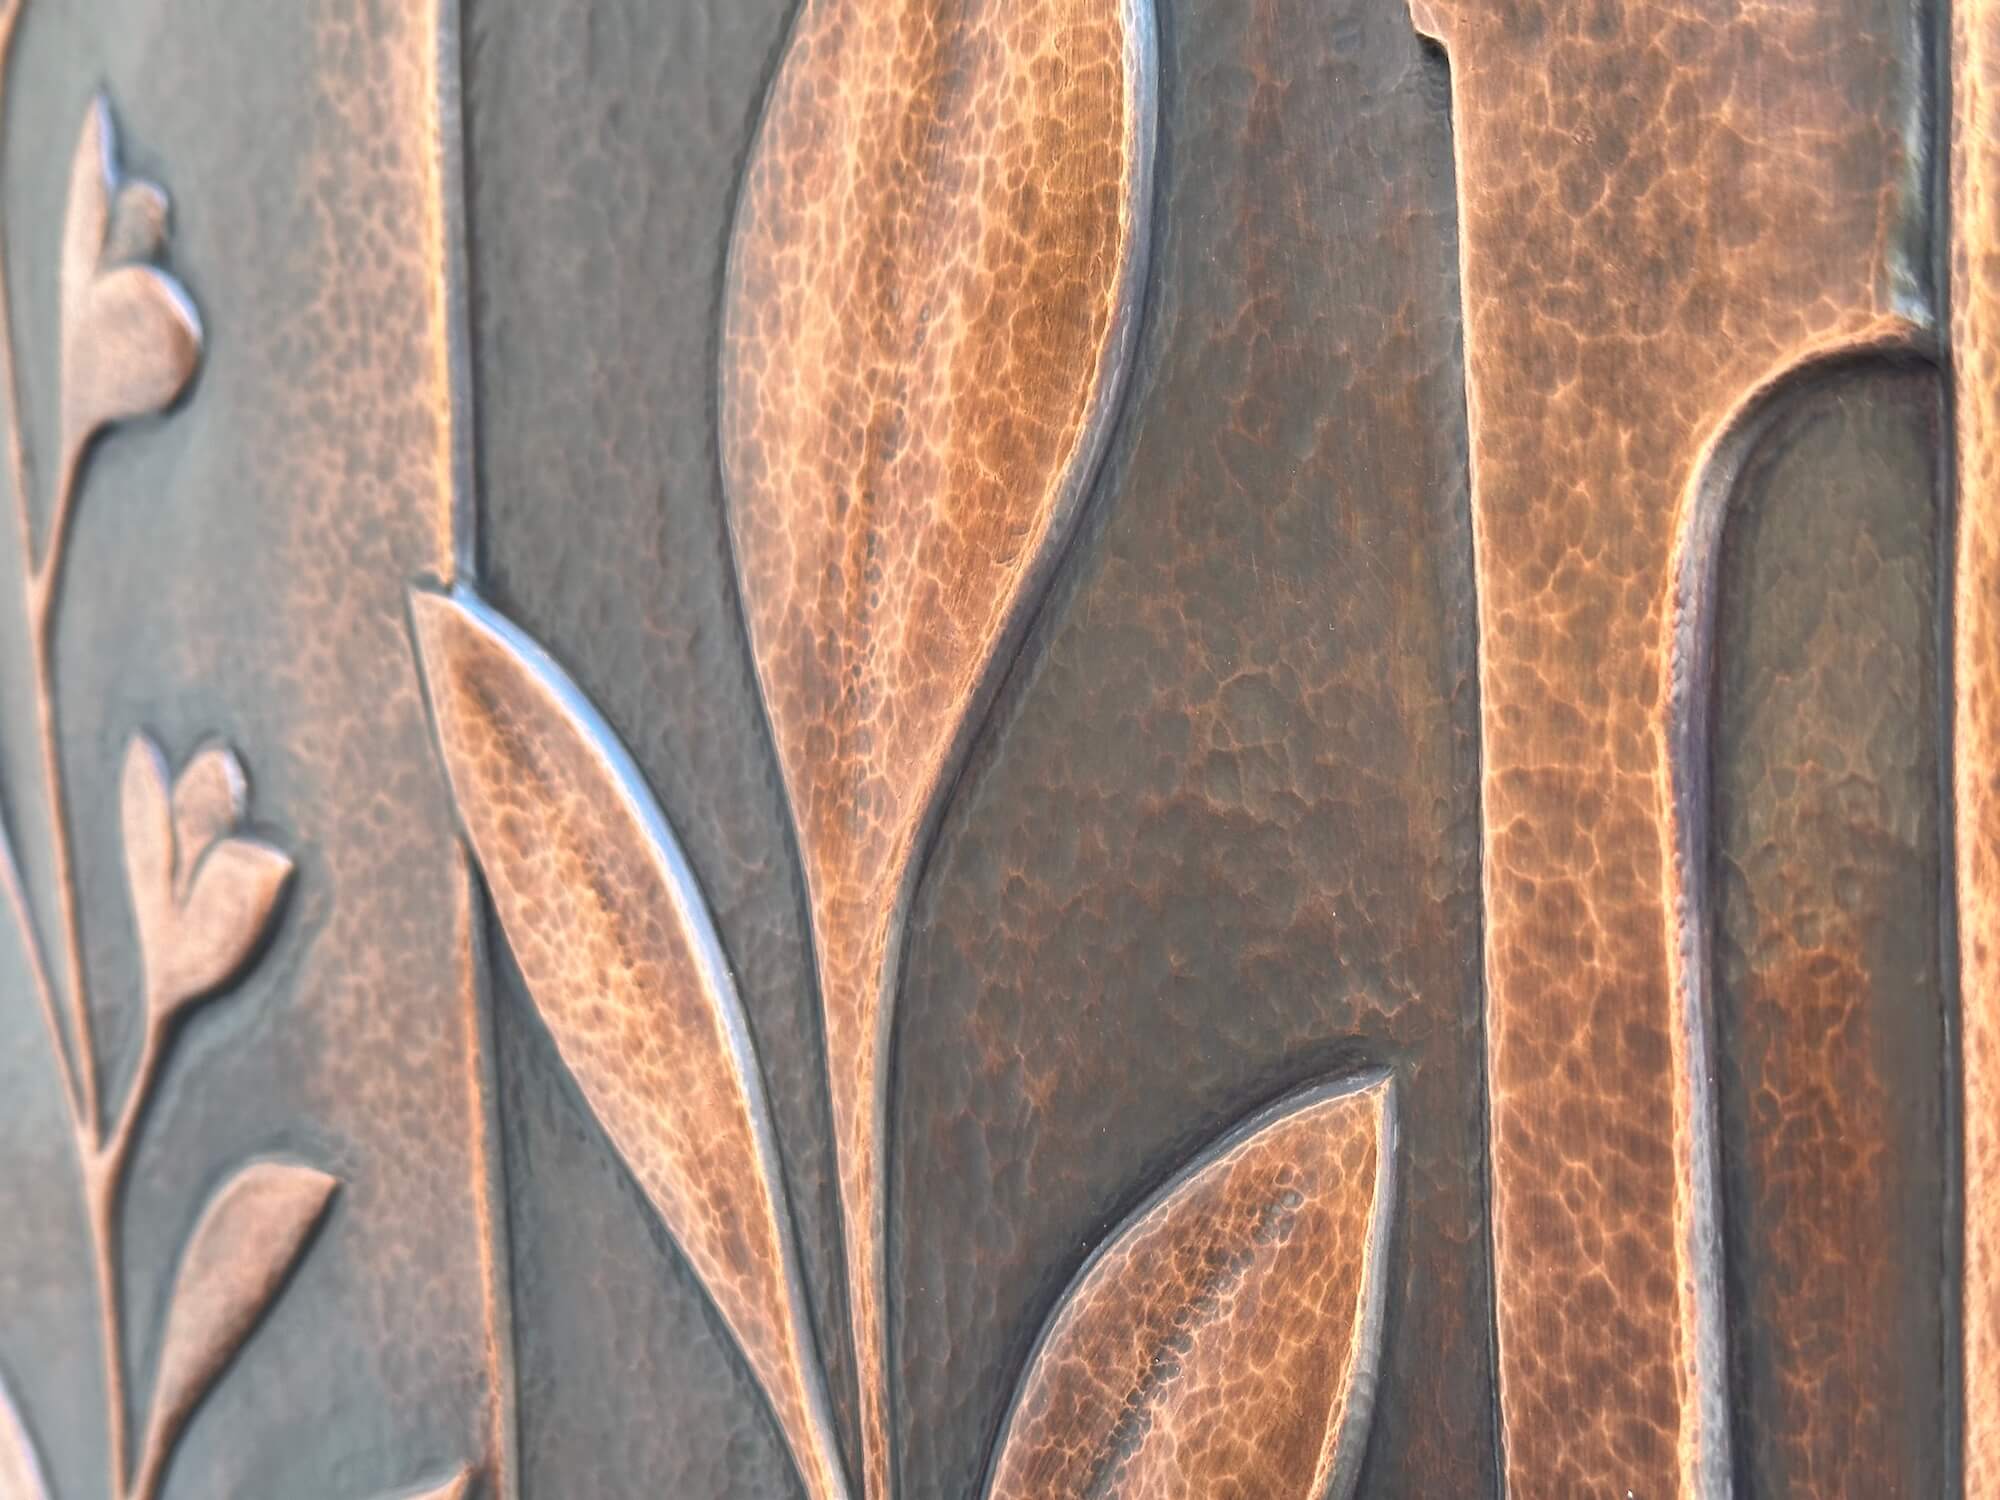
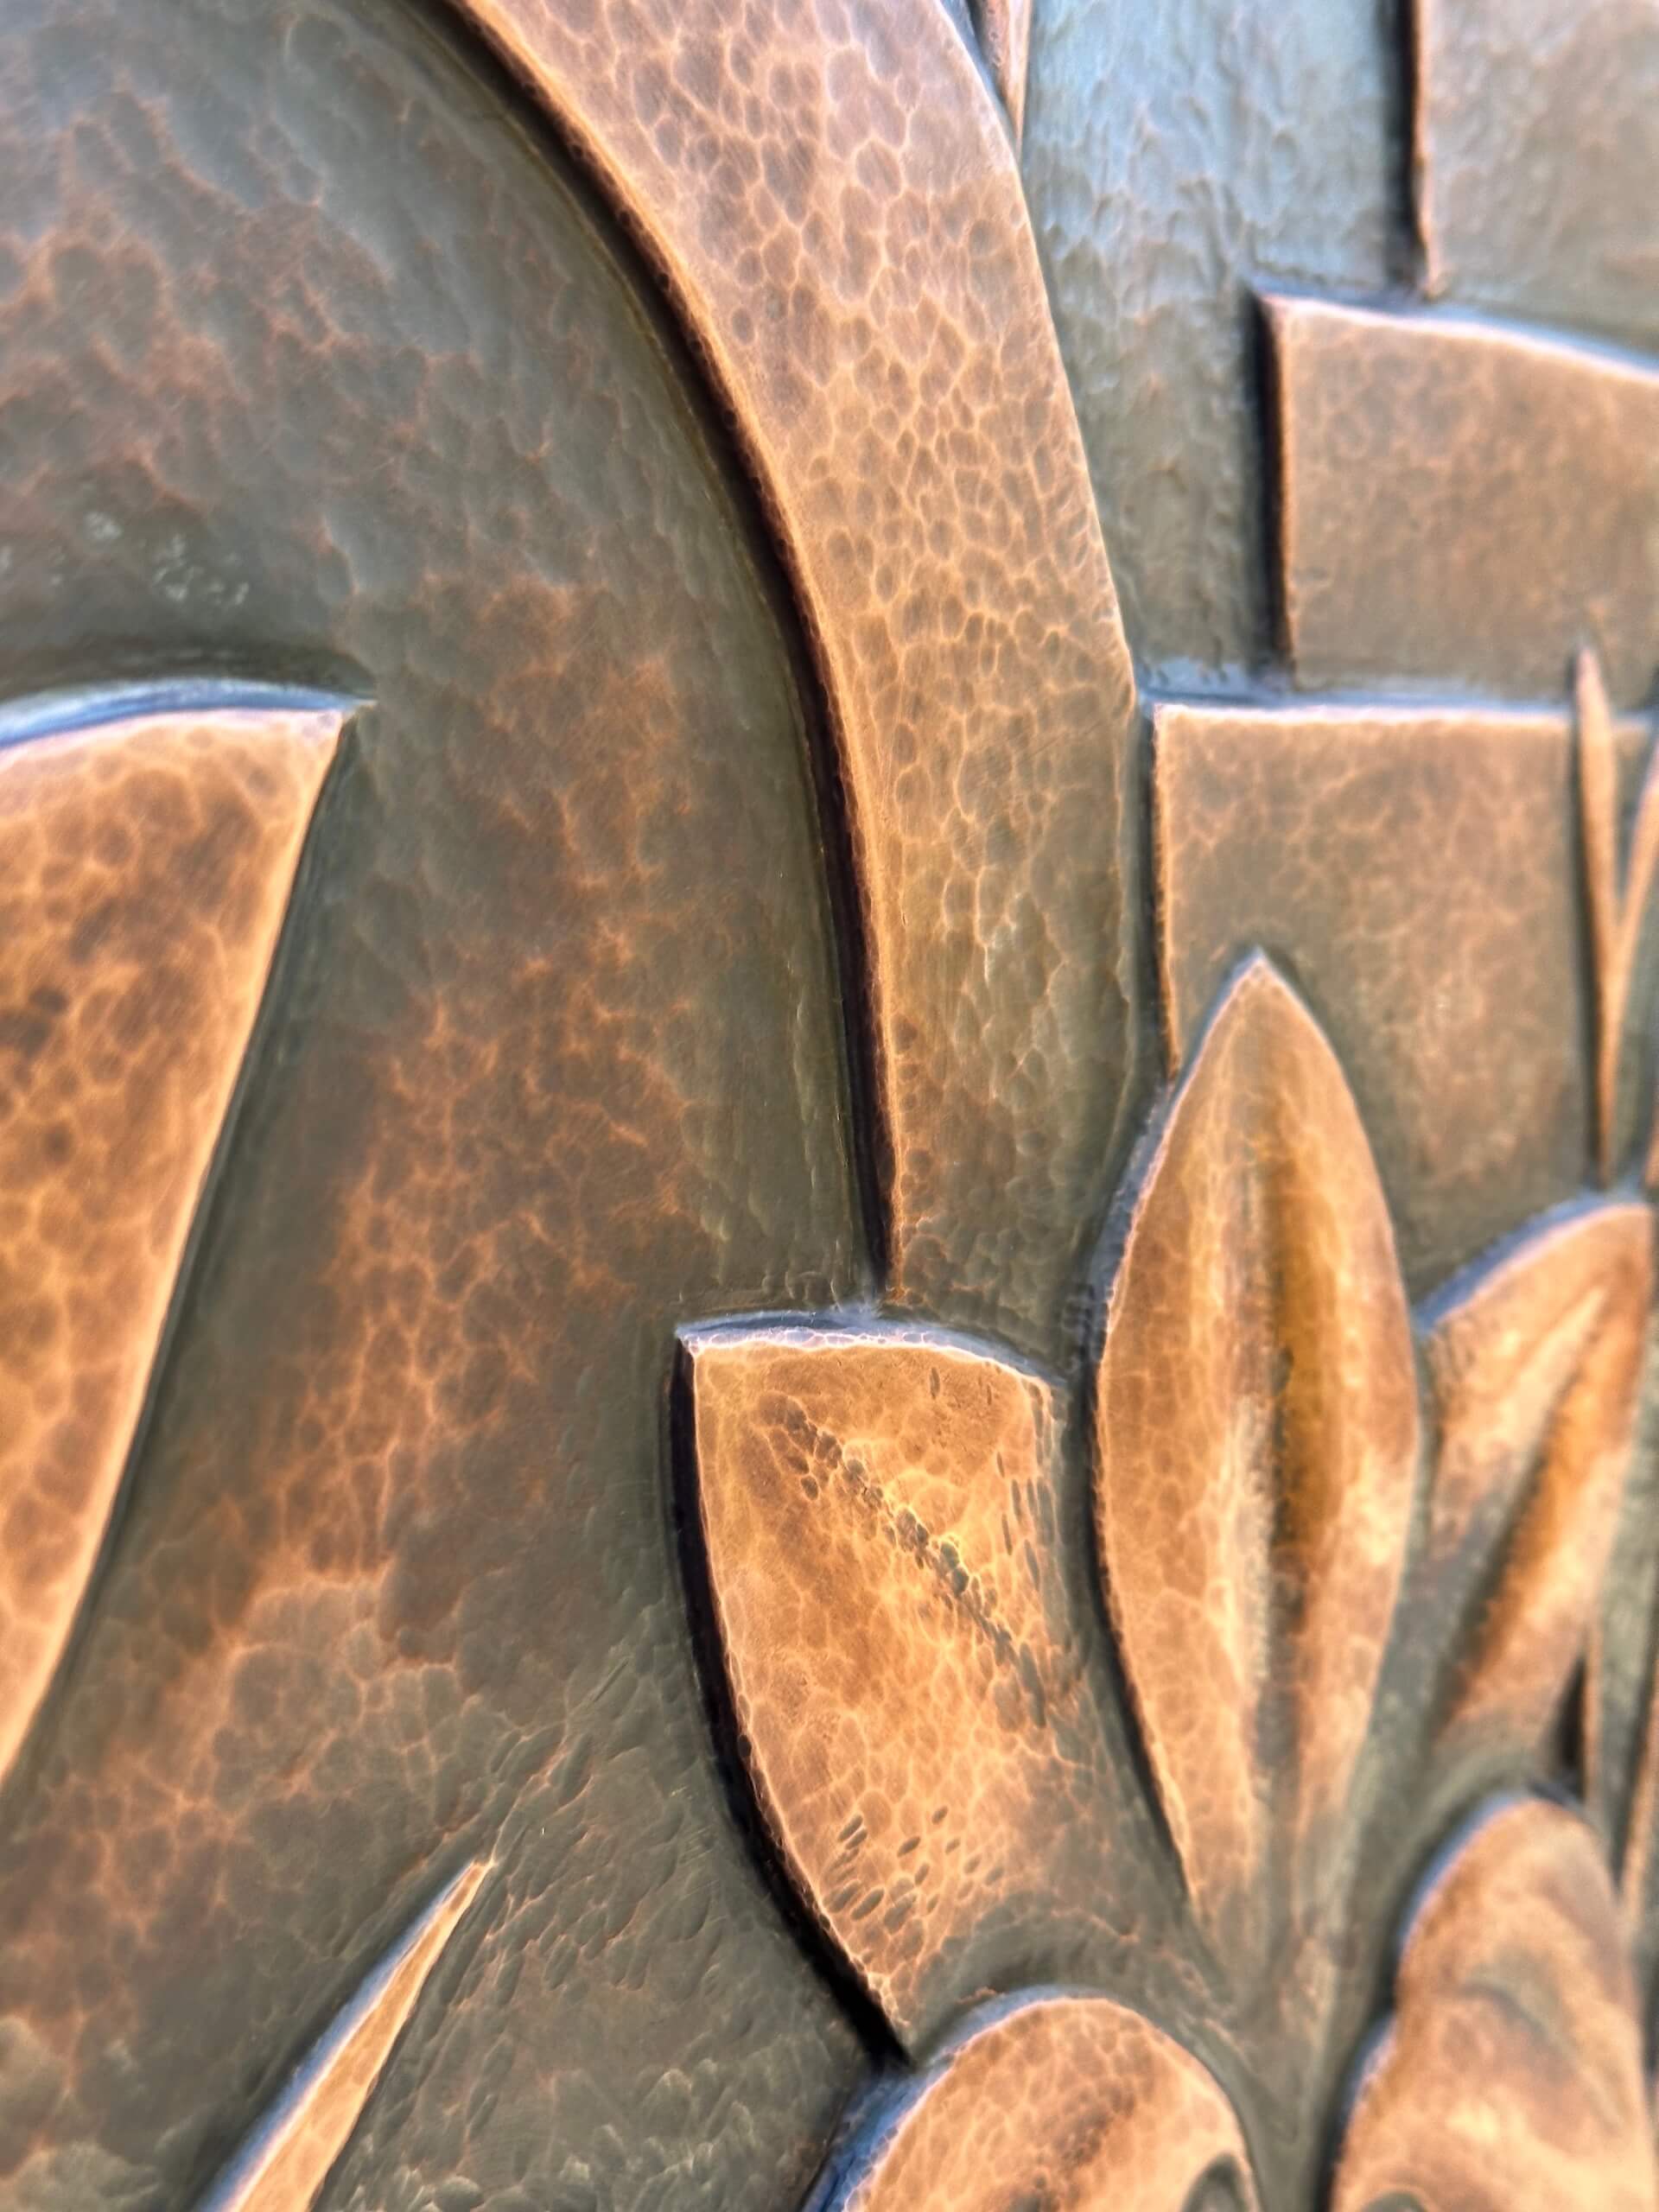
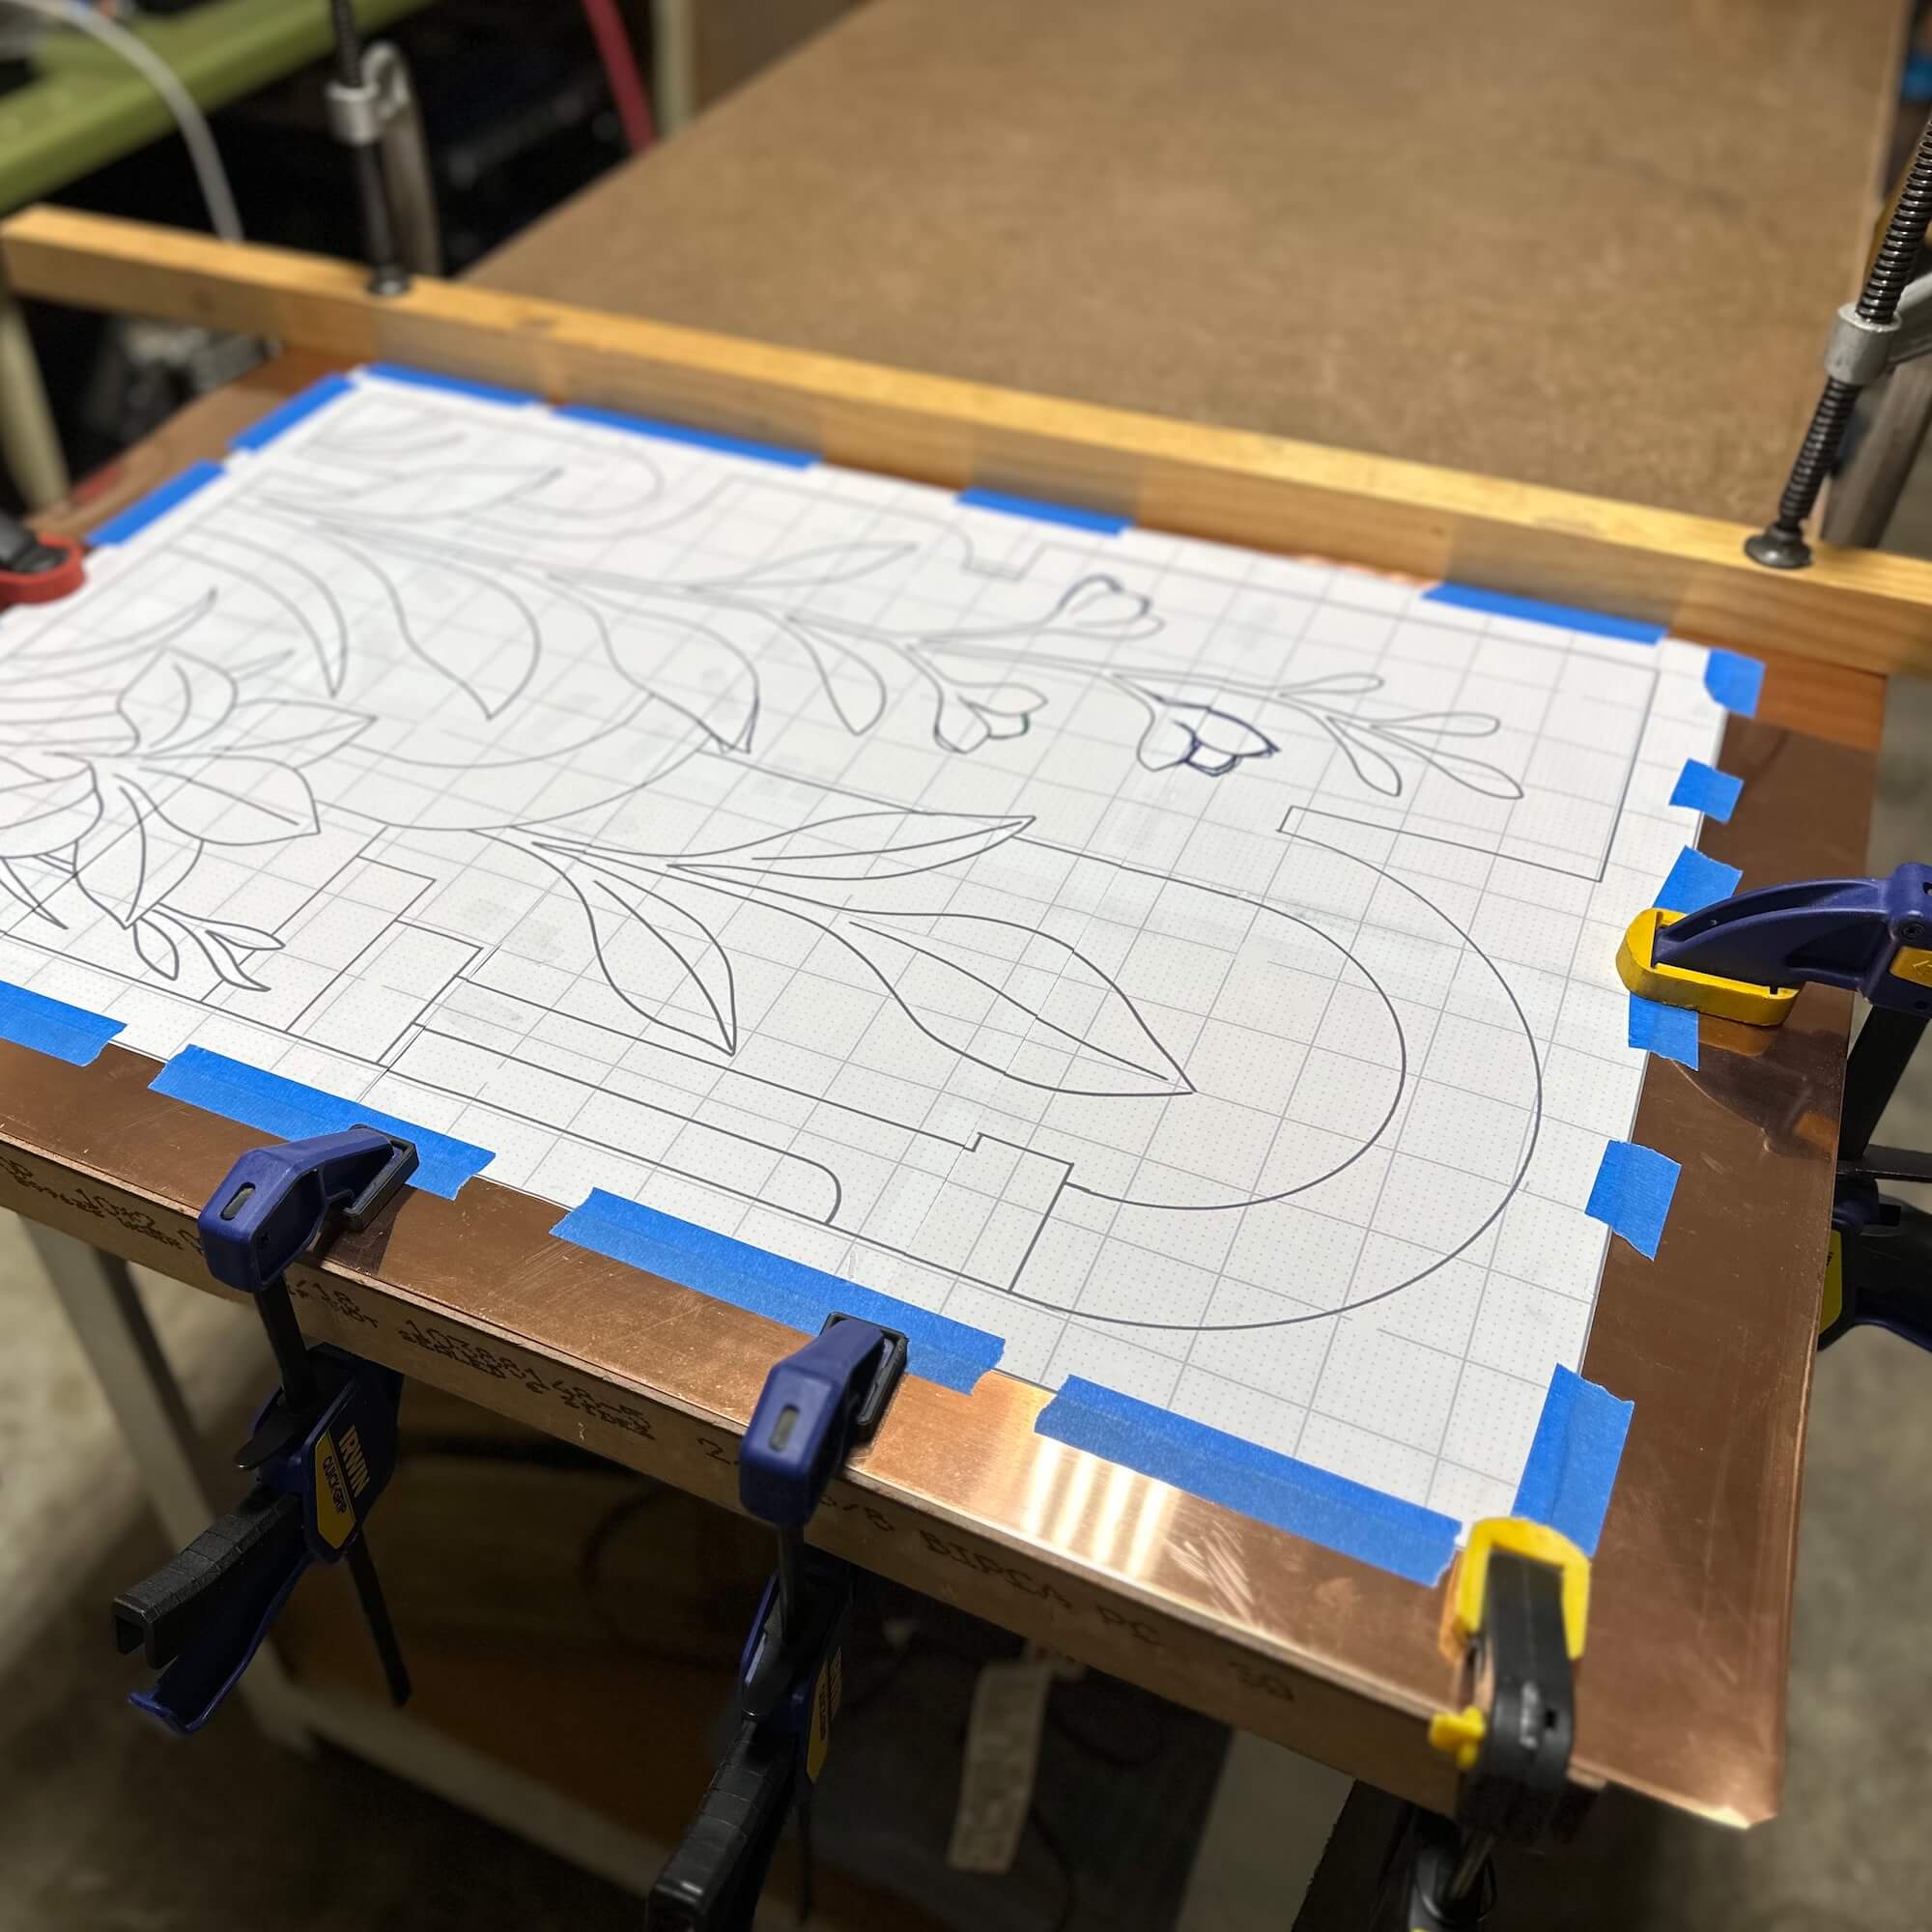
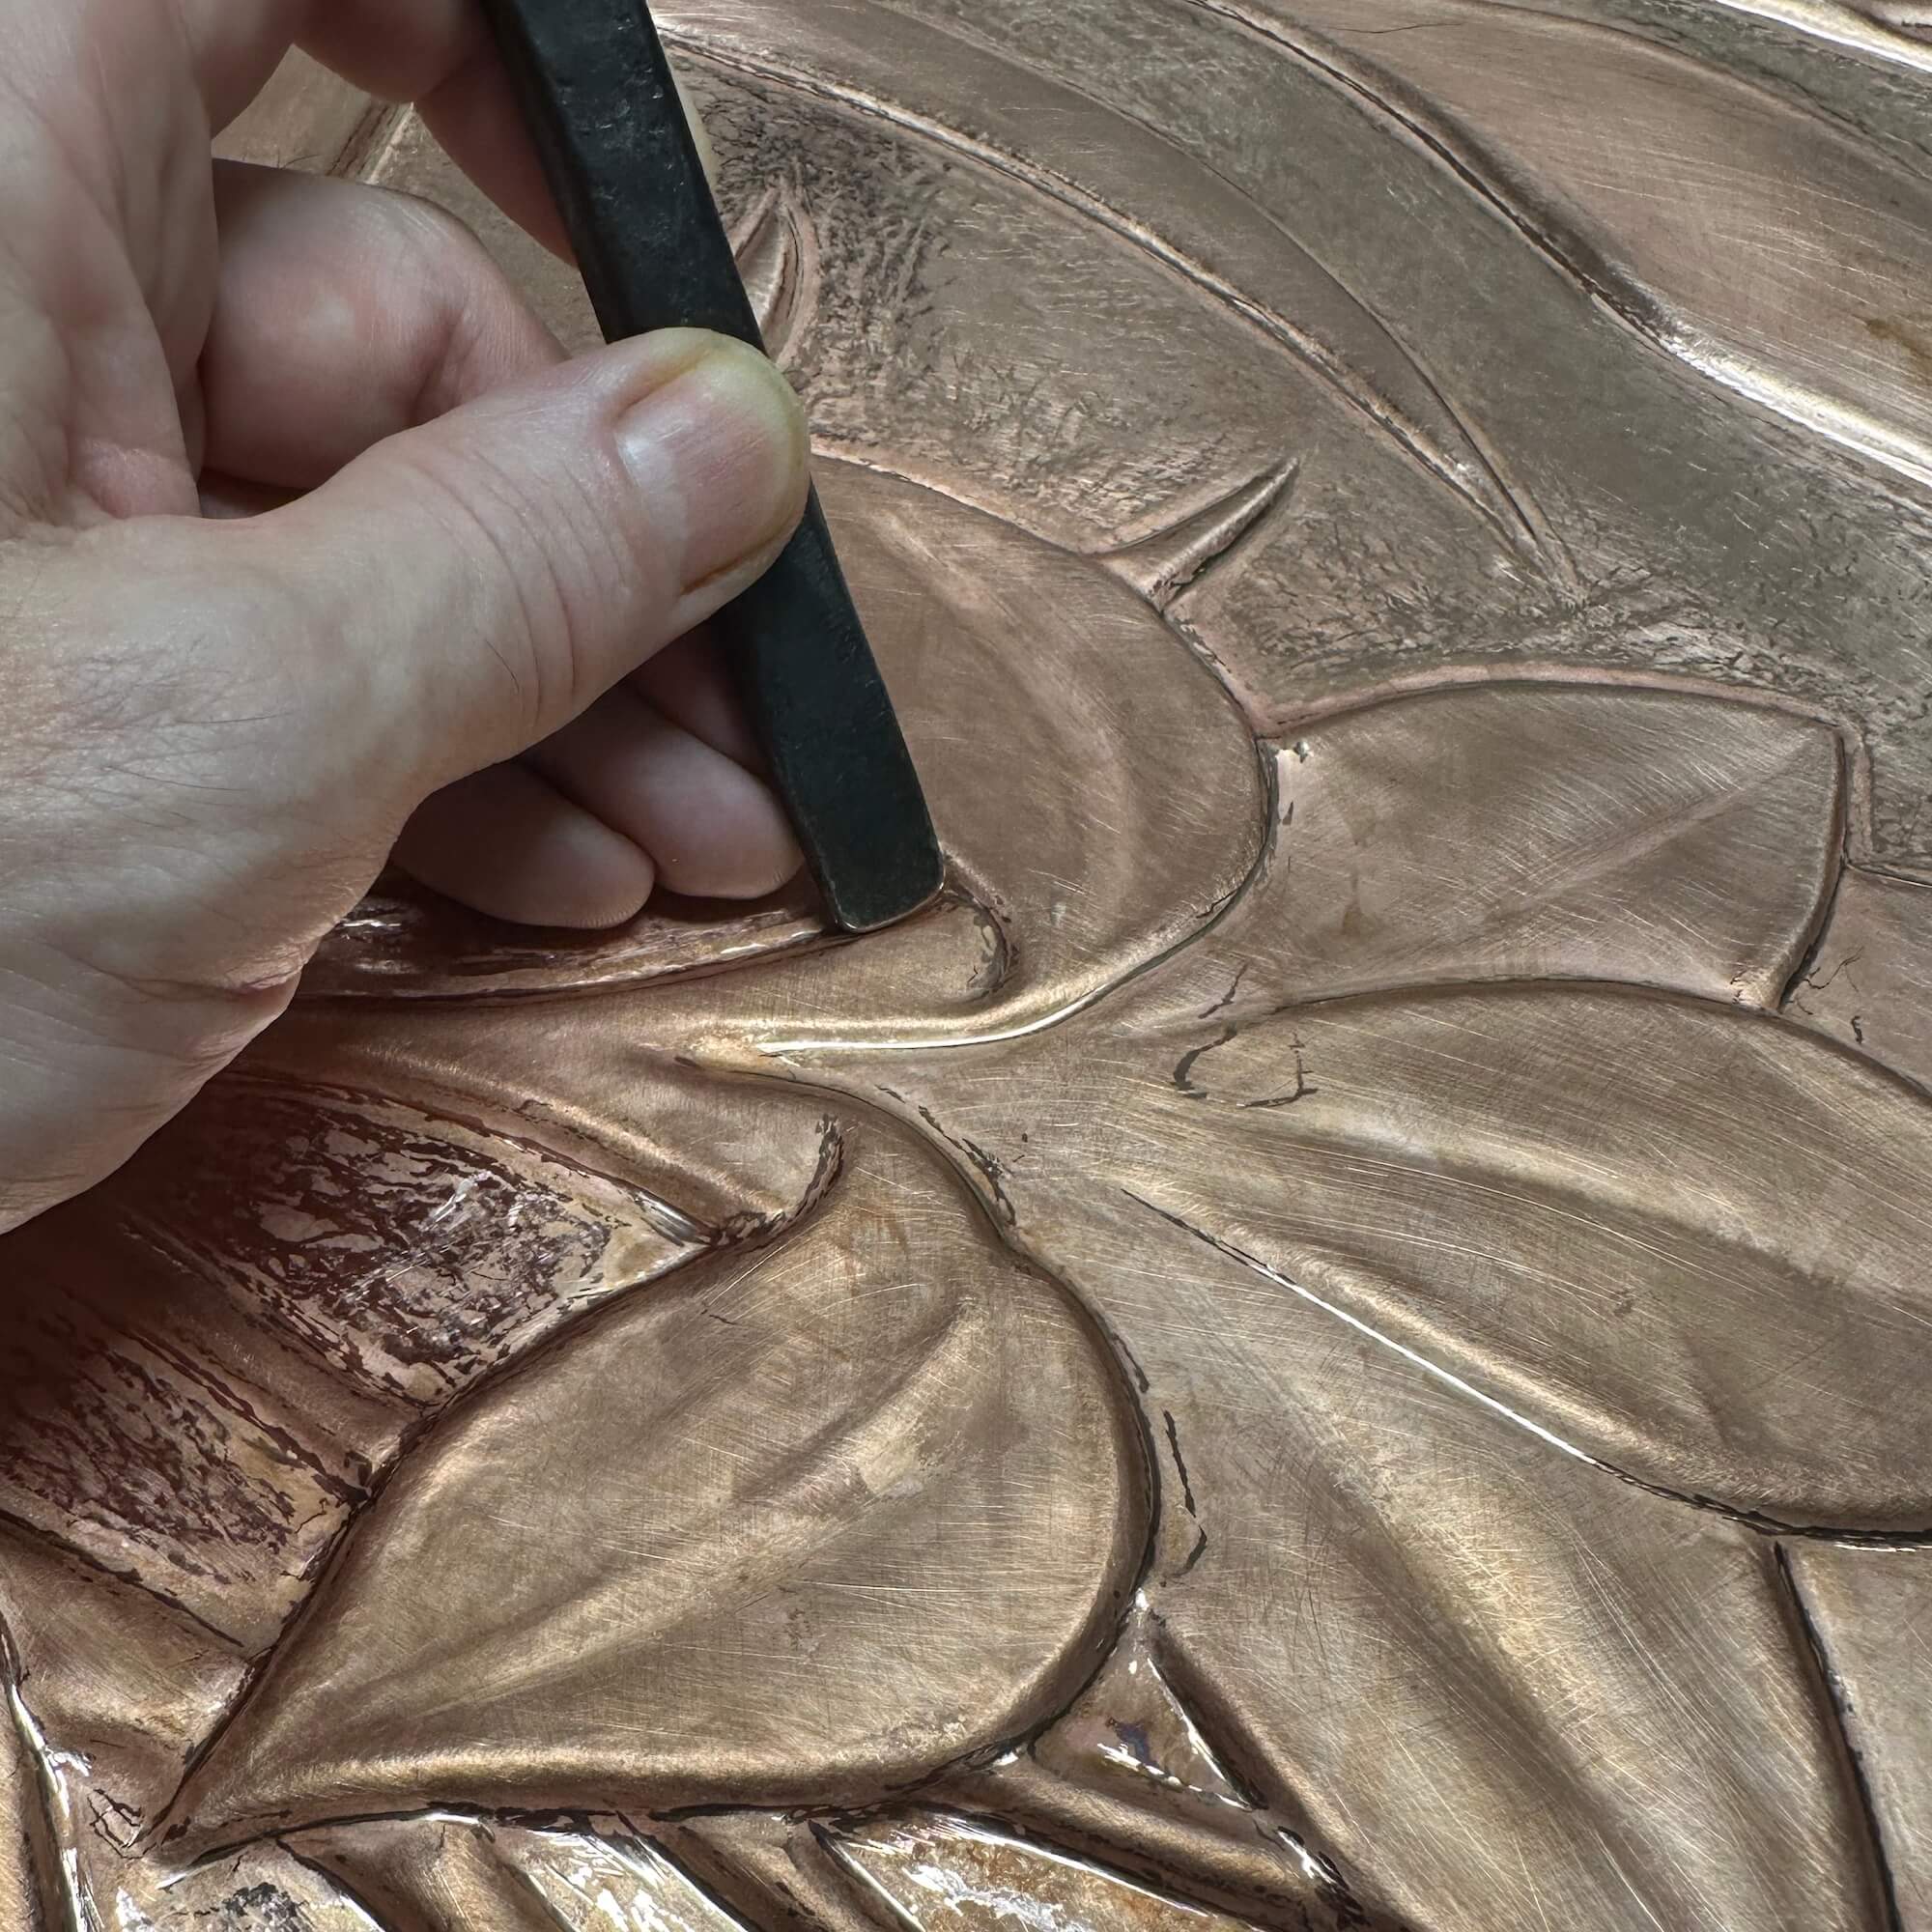
Organic, botanical forms merge with layered architectural shapes in this one-of-a-kind metal wall sculpture. Hand-formed from a single sheet of copper, the raised relief was pushed directly into the metal, leaving a surface patterned with the impressions of the forming process. This original design blends classical motifs with a contemporary composition, giving it a versatile style that matches a range of decor. Only one has been made. There are no duplicates or molds for mass-production.
| Weight | 30 lbs |
|---|---|
| Dimensions | 303⁄8 × 201⁄4 × 13⁄4 in |
| Material | Copper |
PHOTOS & VIDEO


DESCRIPTION & SPECIFICATIONS

ARTWORK DETAILS
| Size | 30⅜ x 20¼ x 1¾ in |
|---|---|
| Weight | 30 lbs |
| Material | Copper |
| Display | Indoor Only |
MATERIALS AND CONSTRUCTION
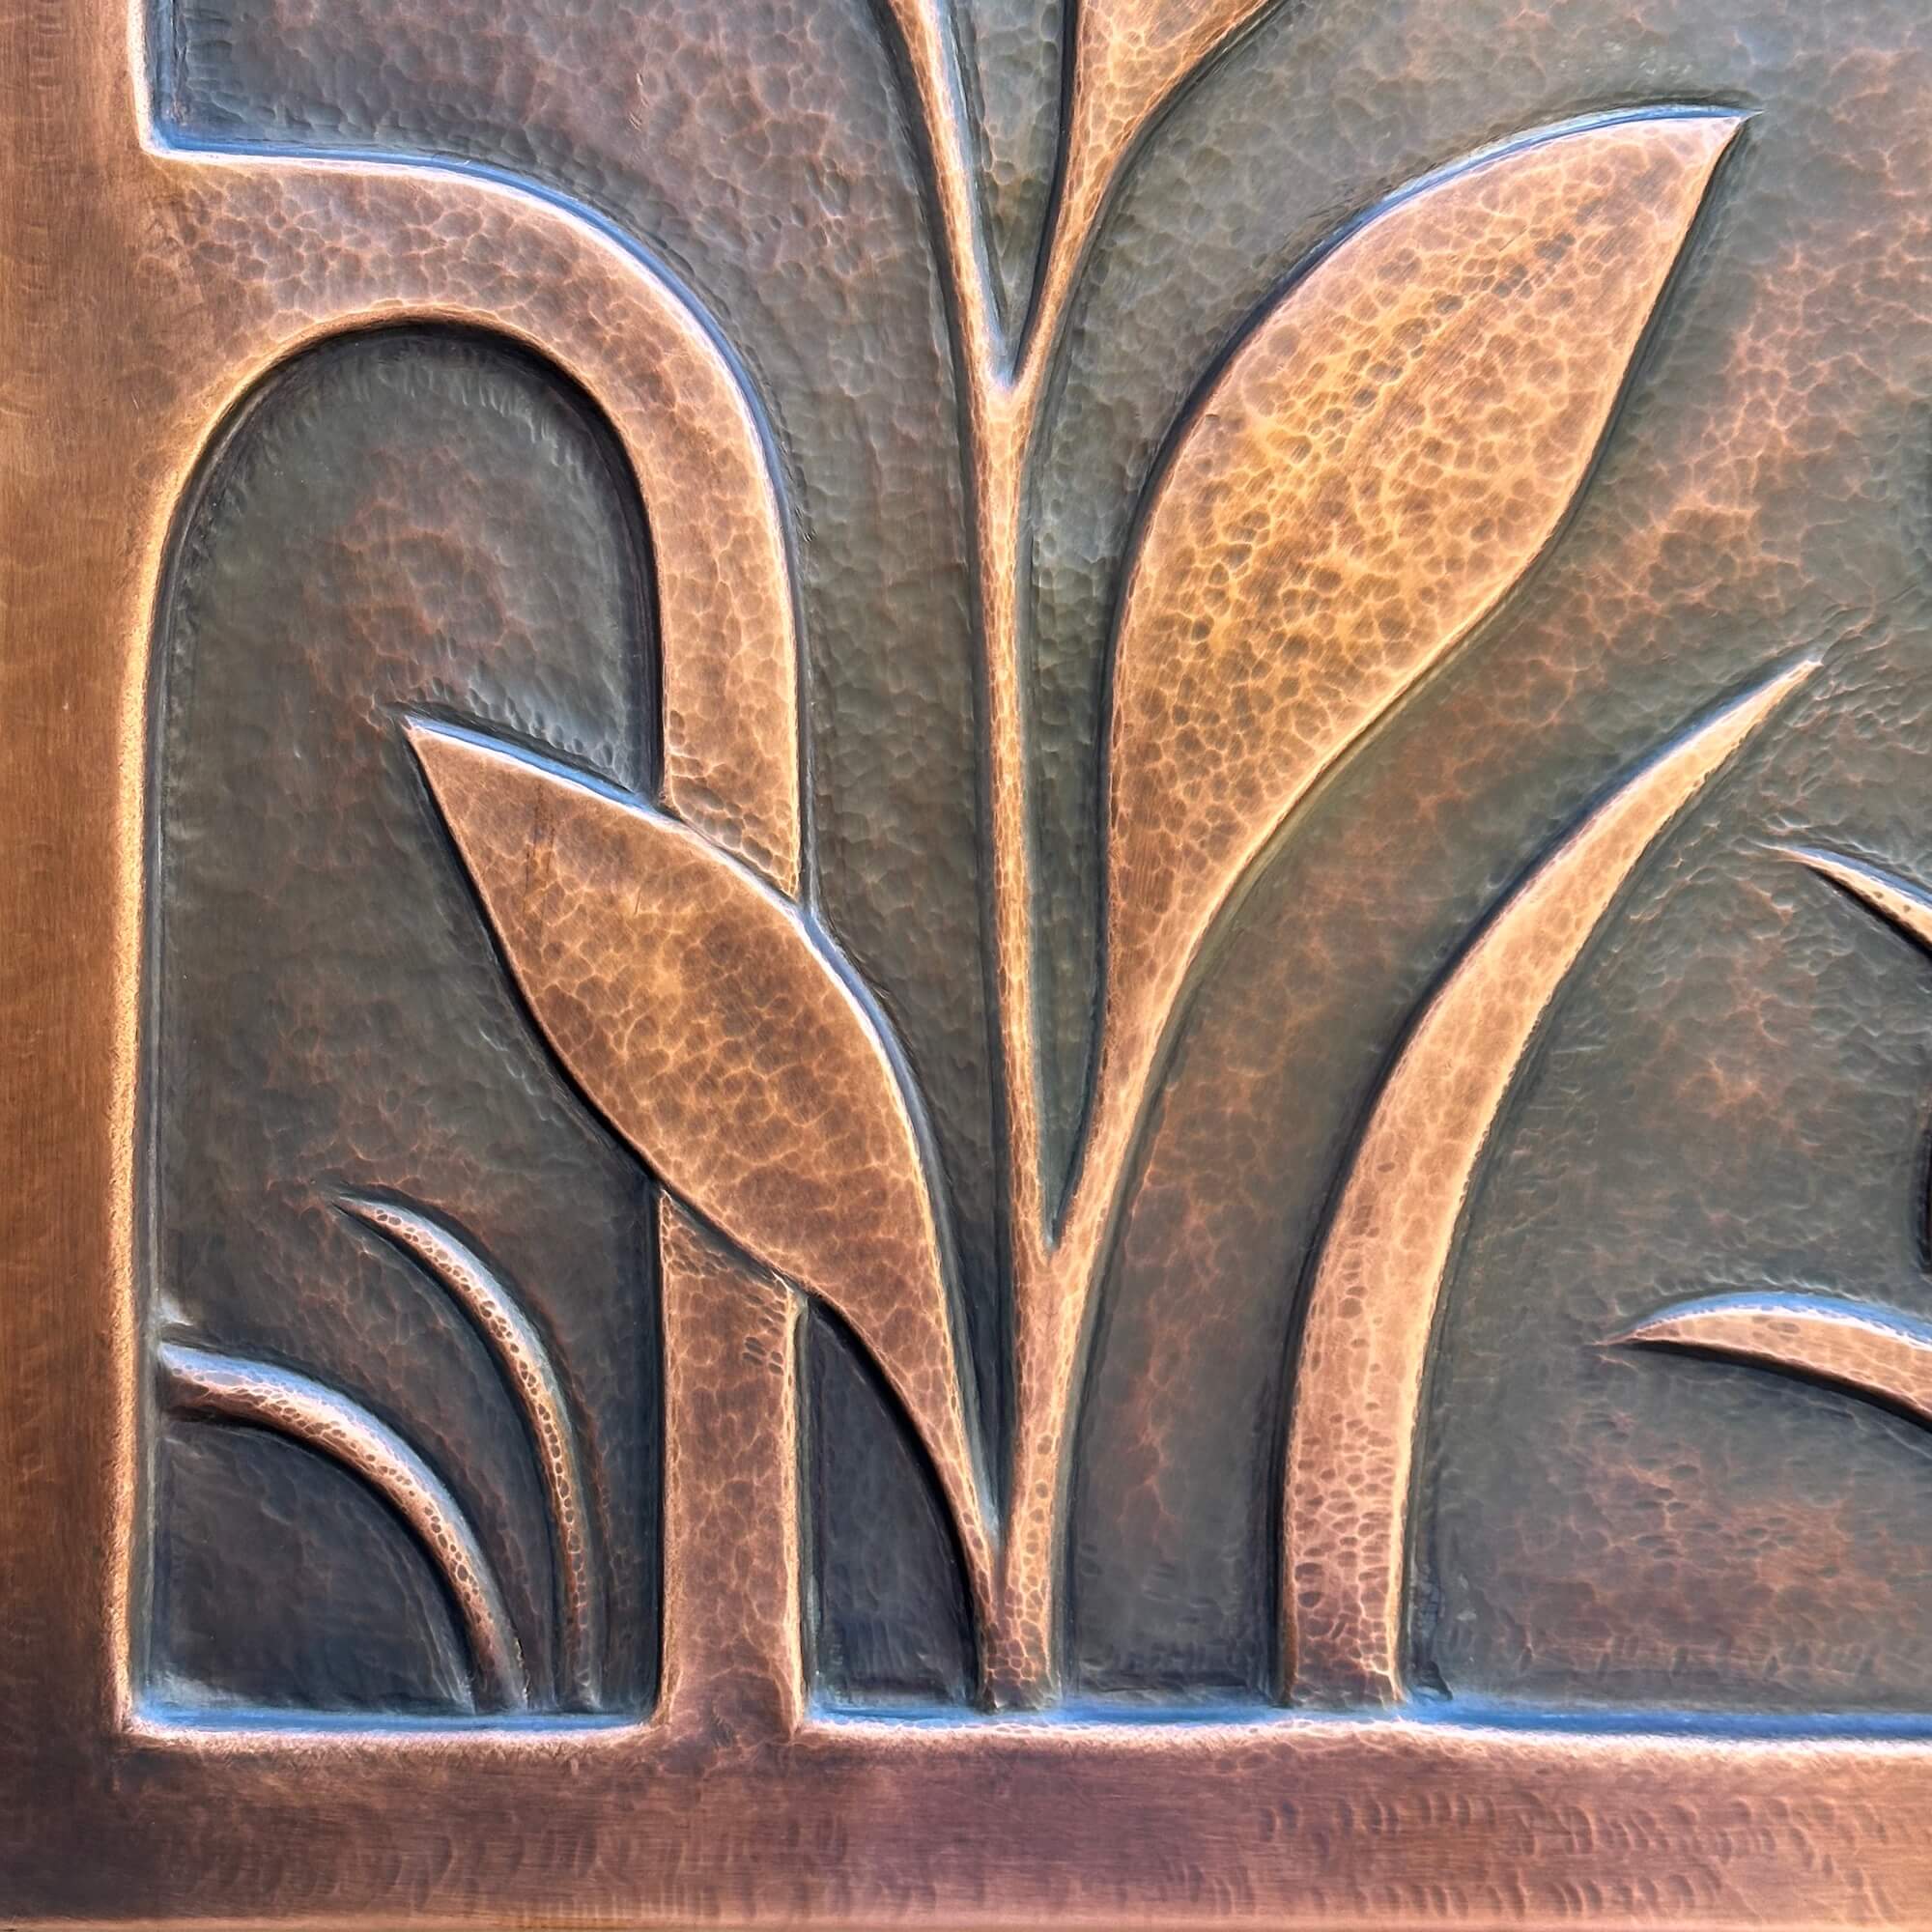
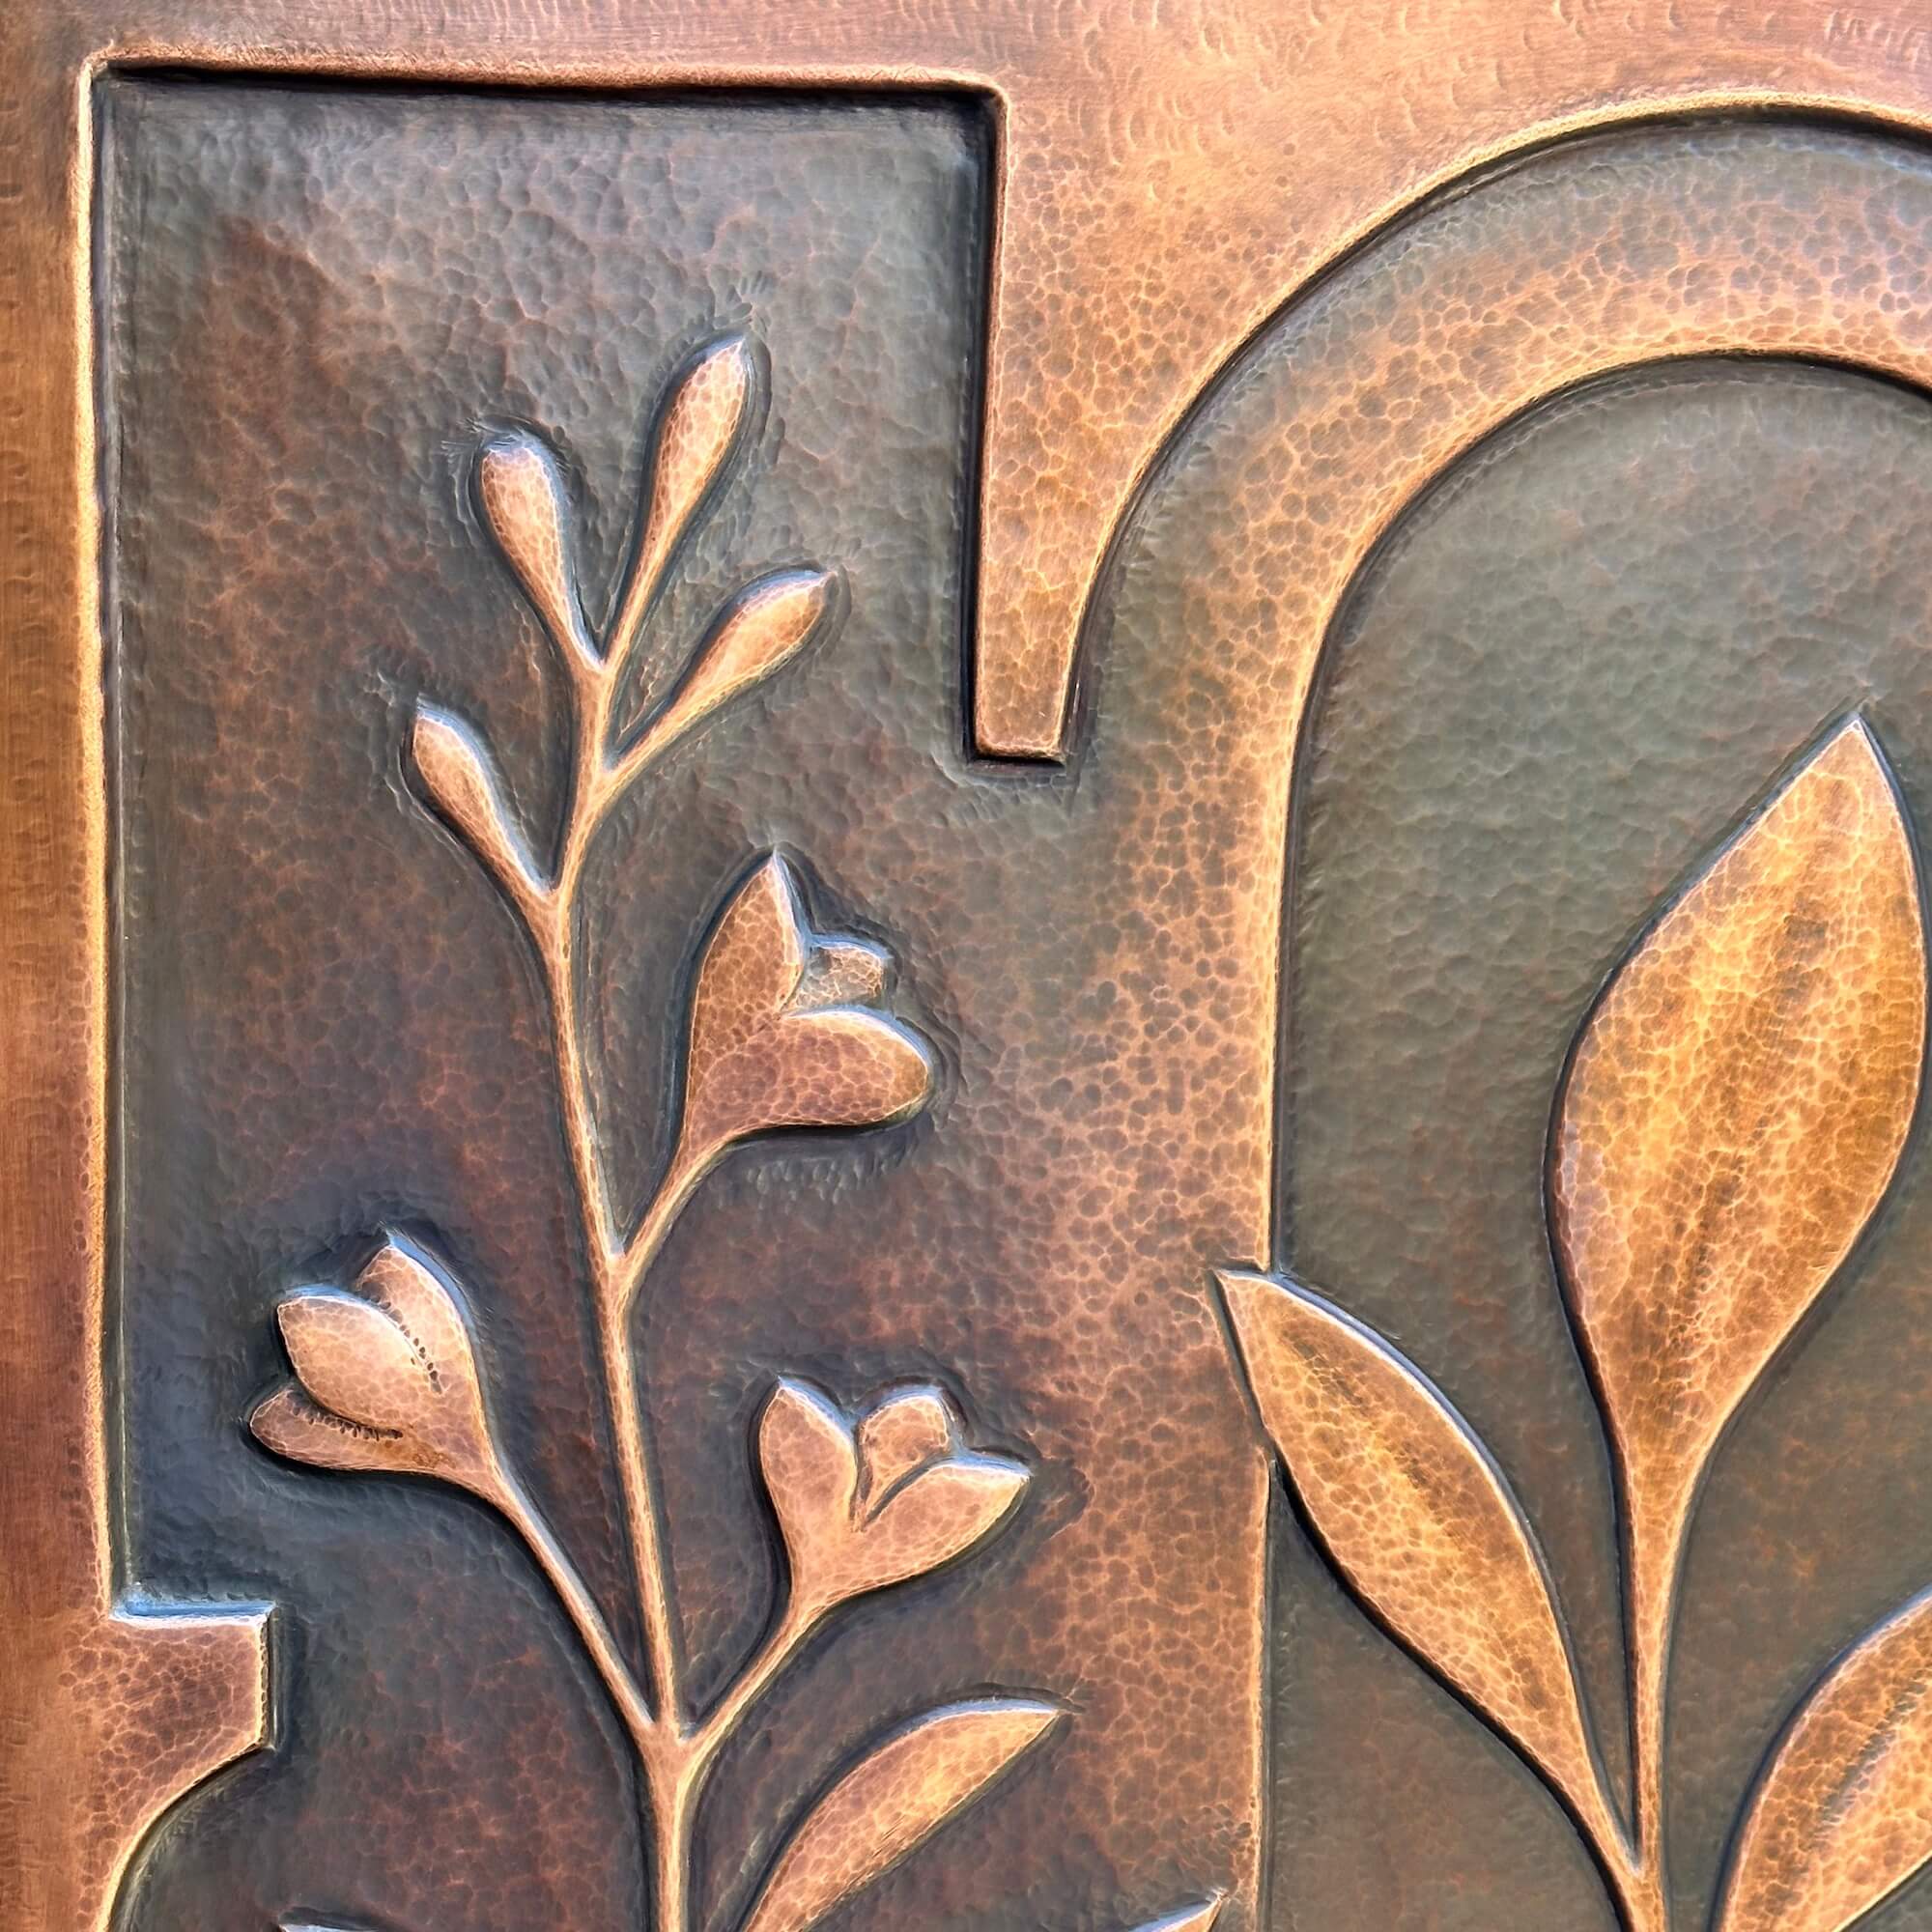
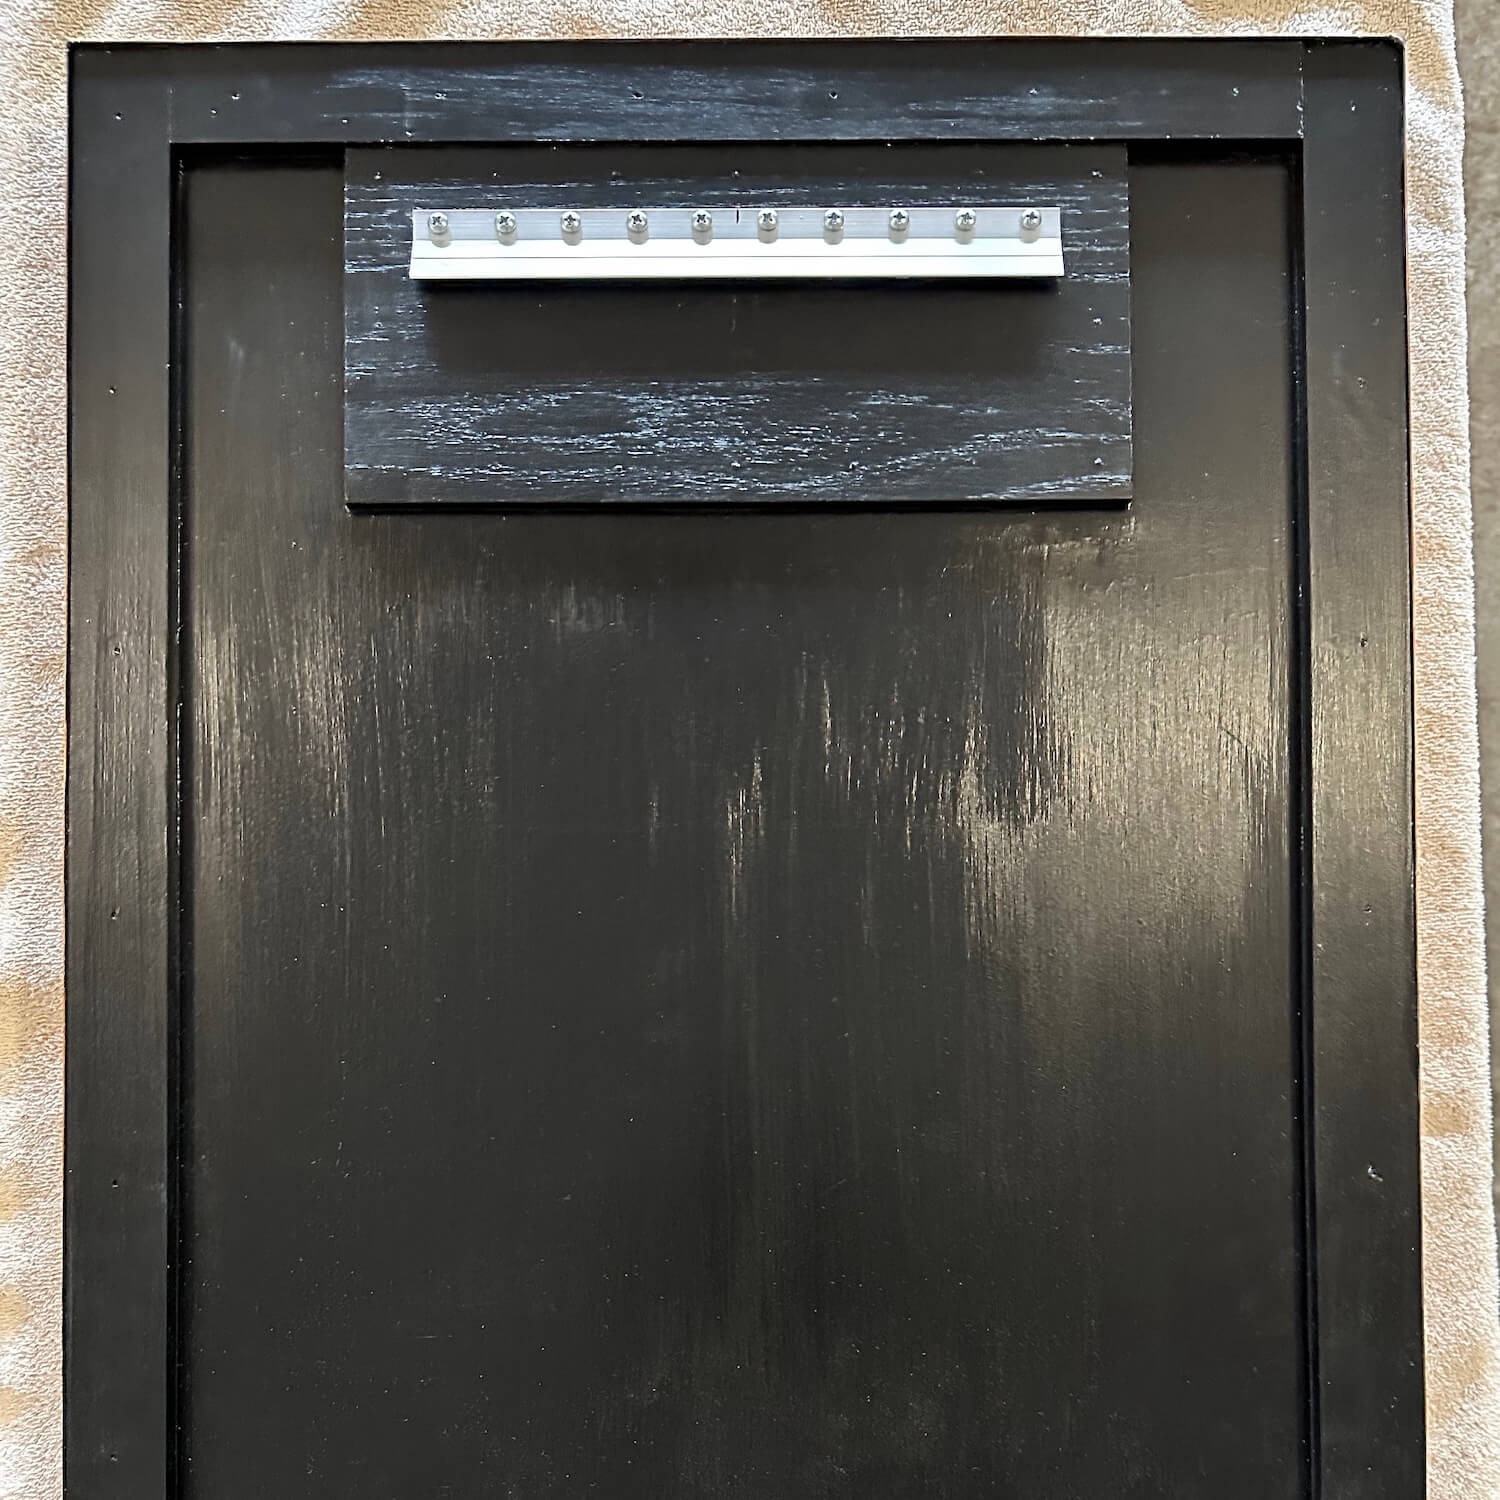
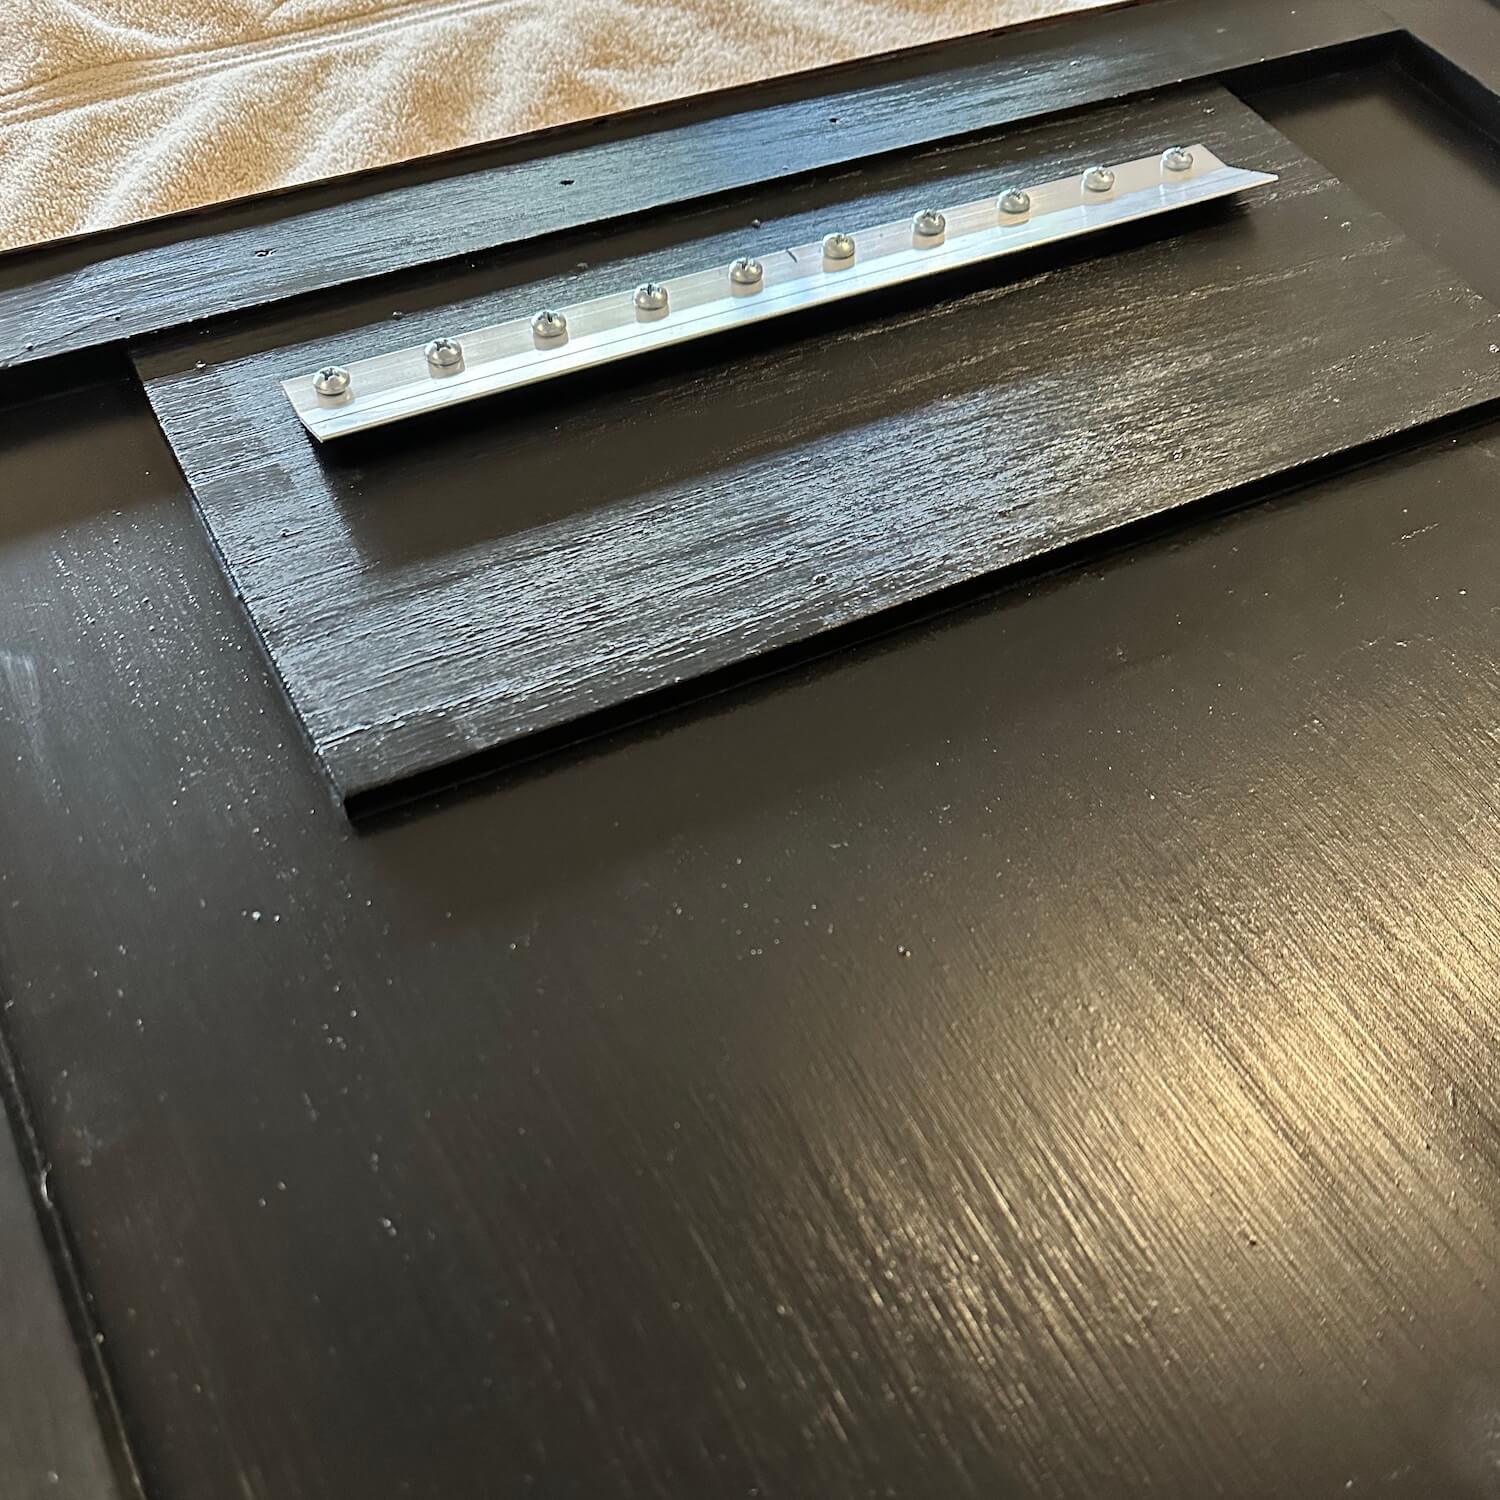
This artwork was sculpted by hand from a single sheet of copper using manual metal forming techniques. While it looks like a heavy, solid slab, it's actually a formed copper shell approximately the thickness of a penny, built around an internal wooden core. The internal wood support structure adds stability and provides a secure place to attach the hanging hardware.
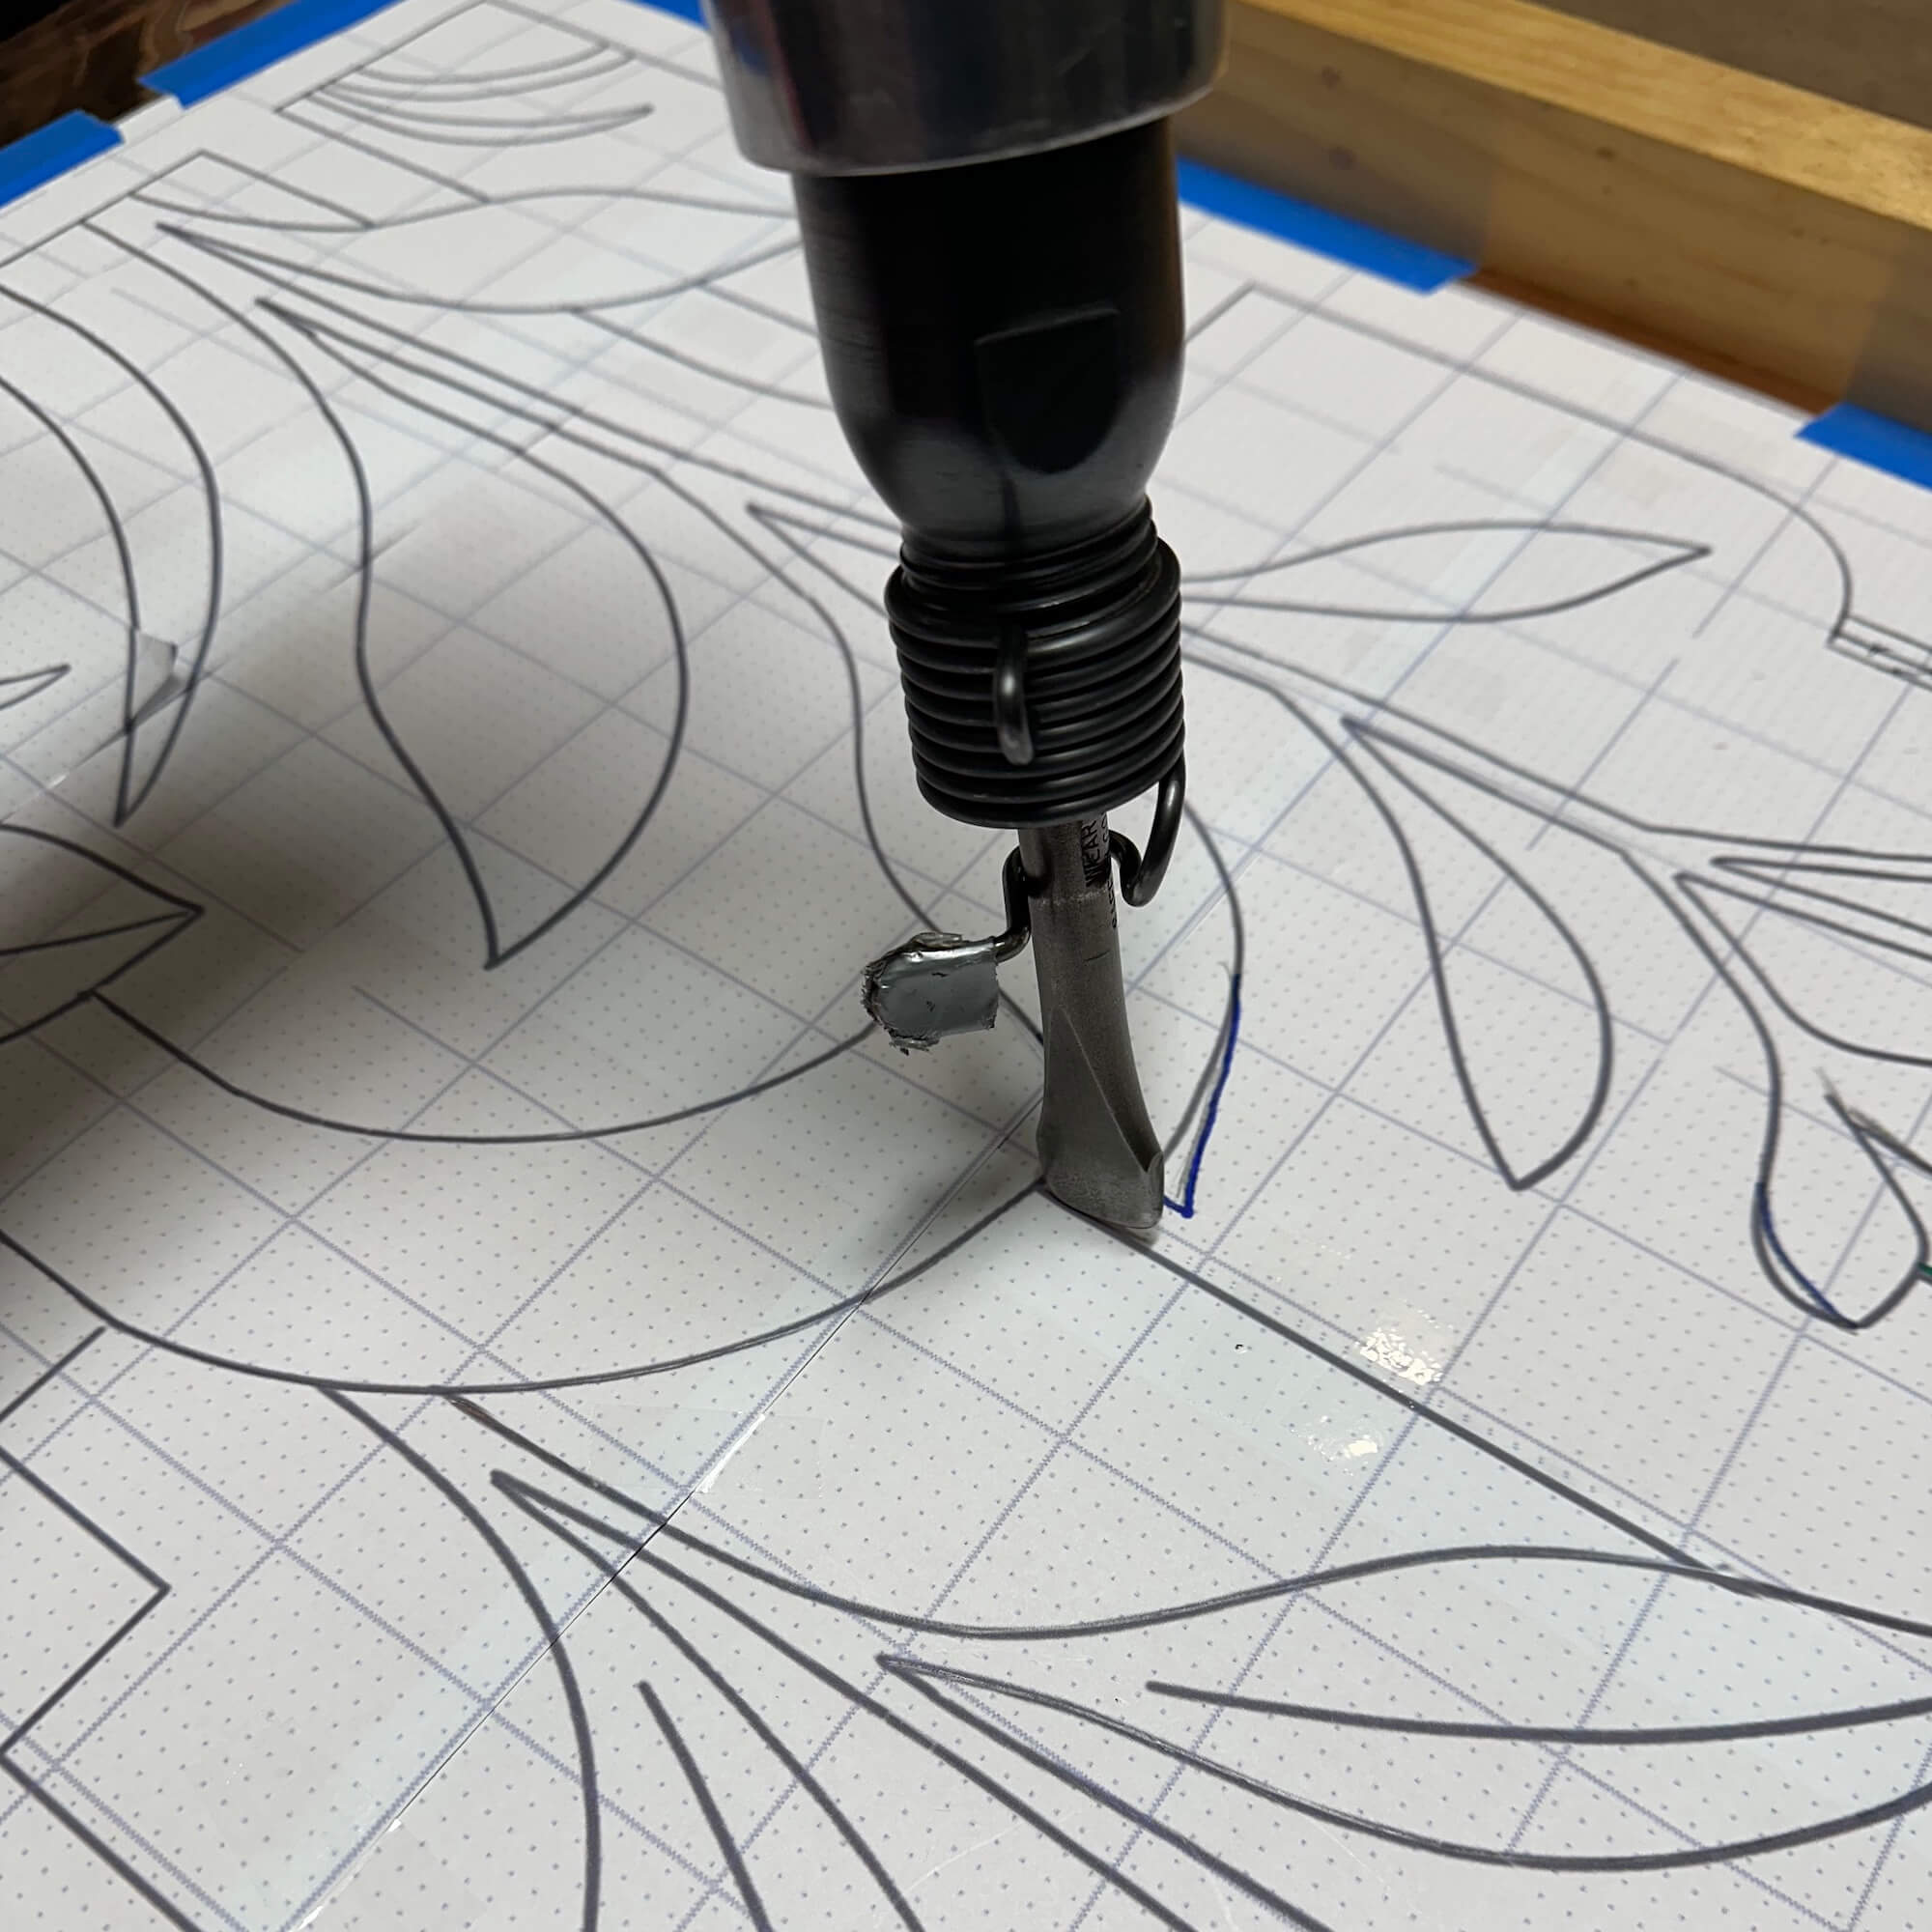
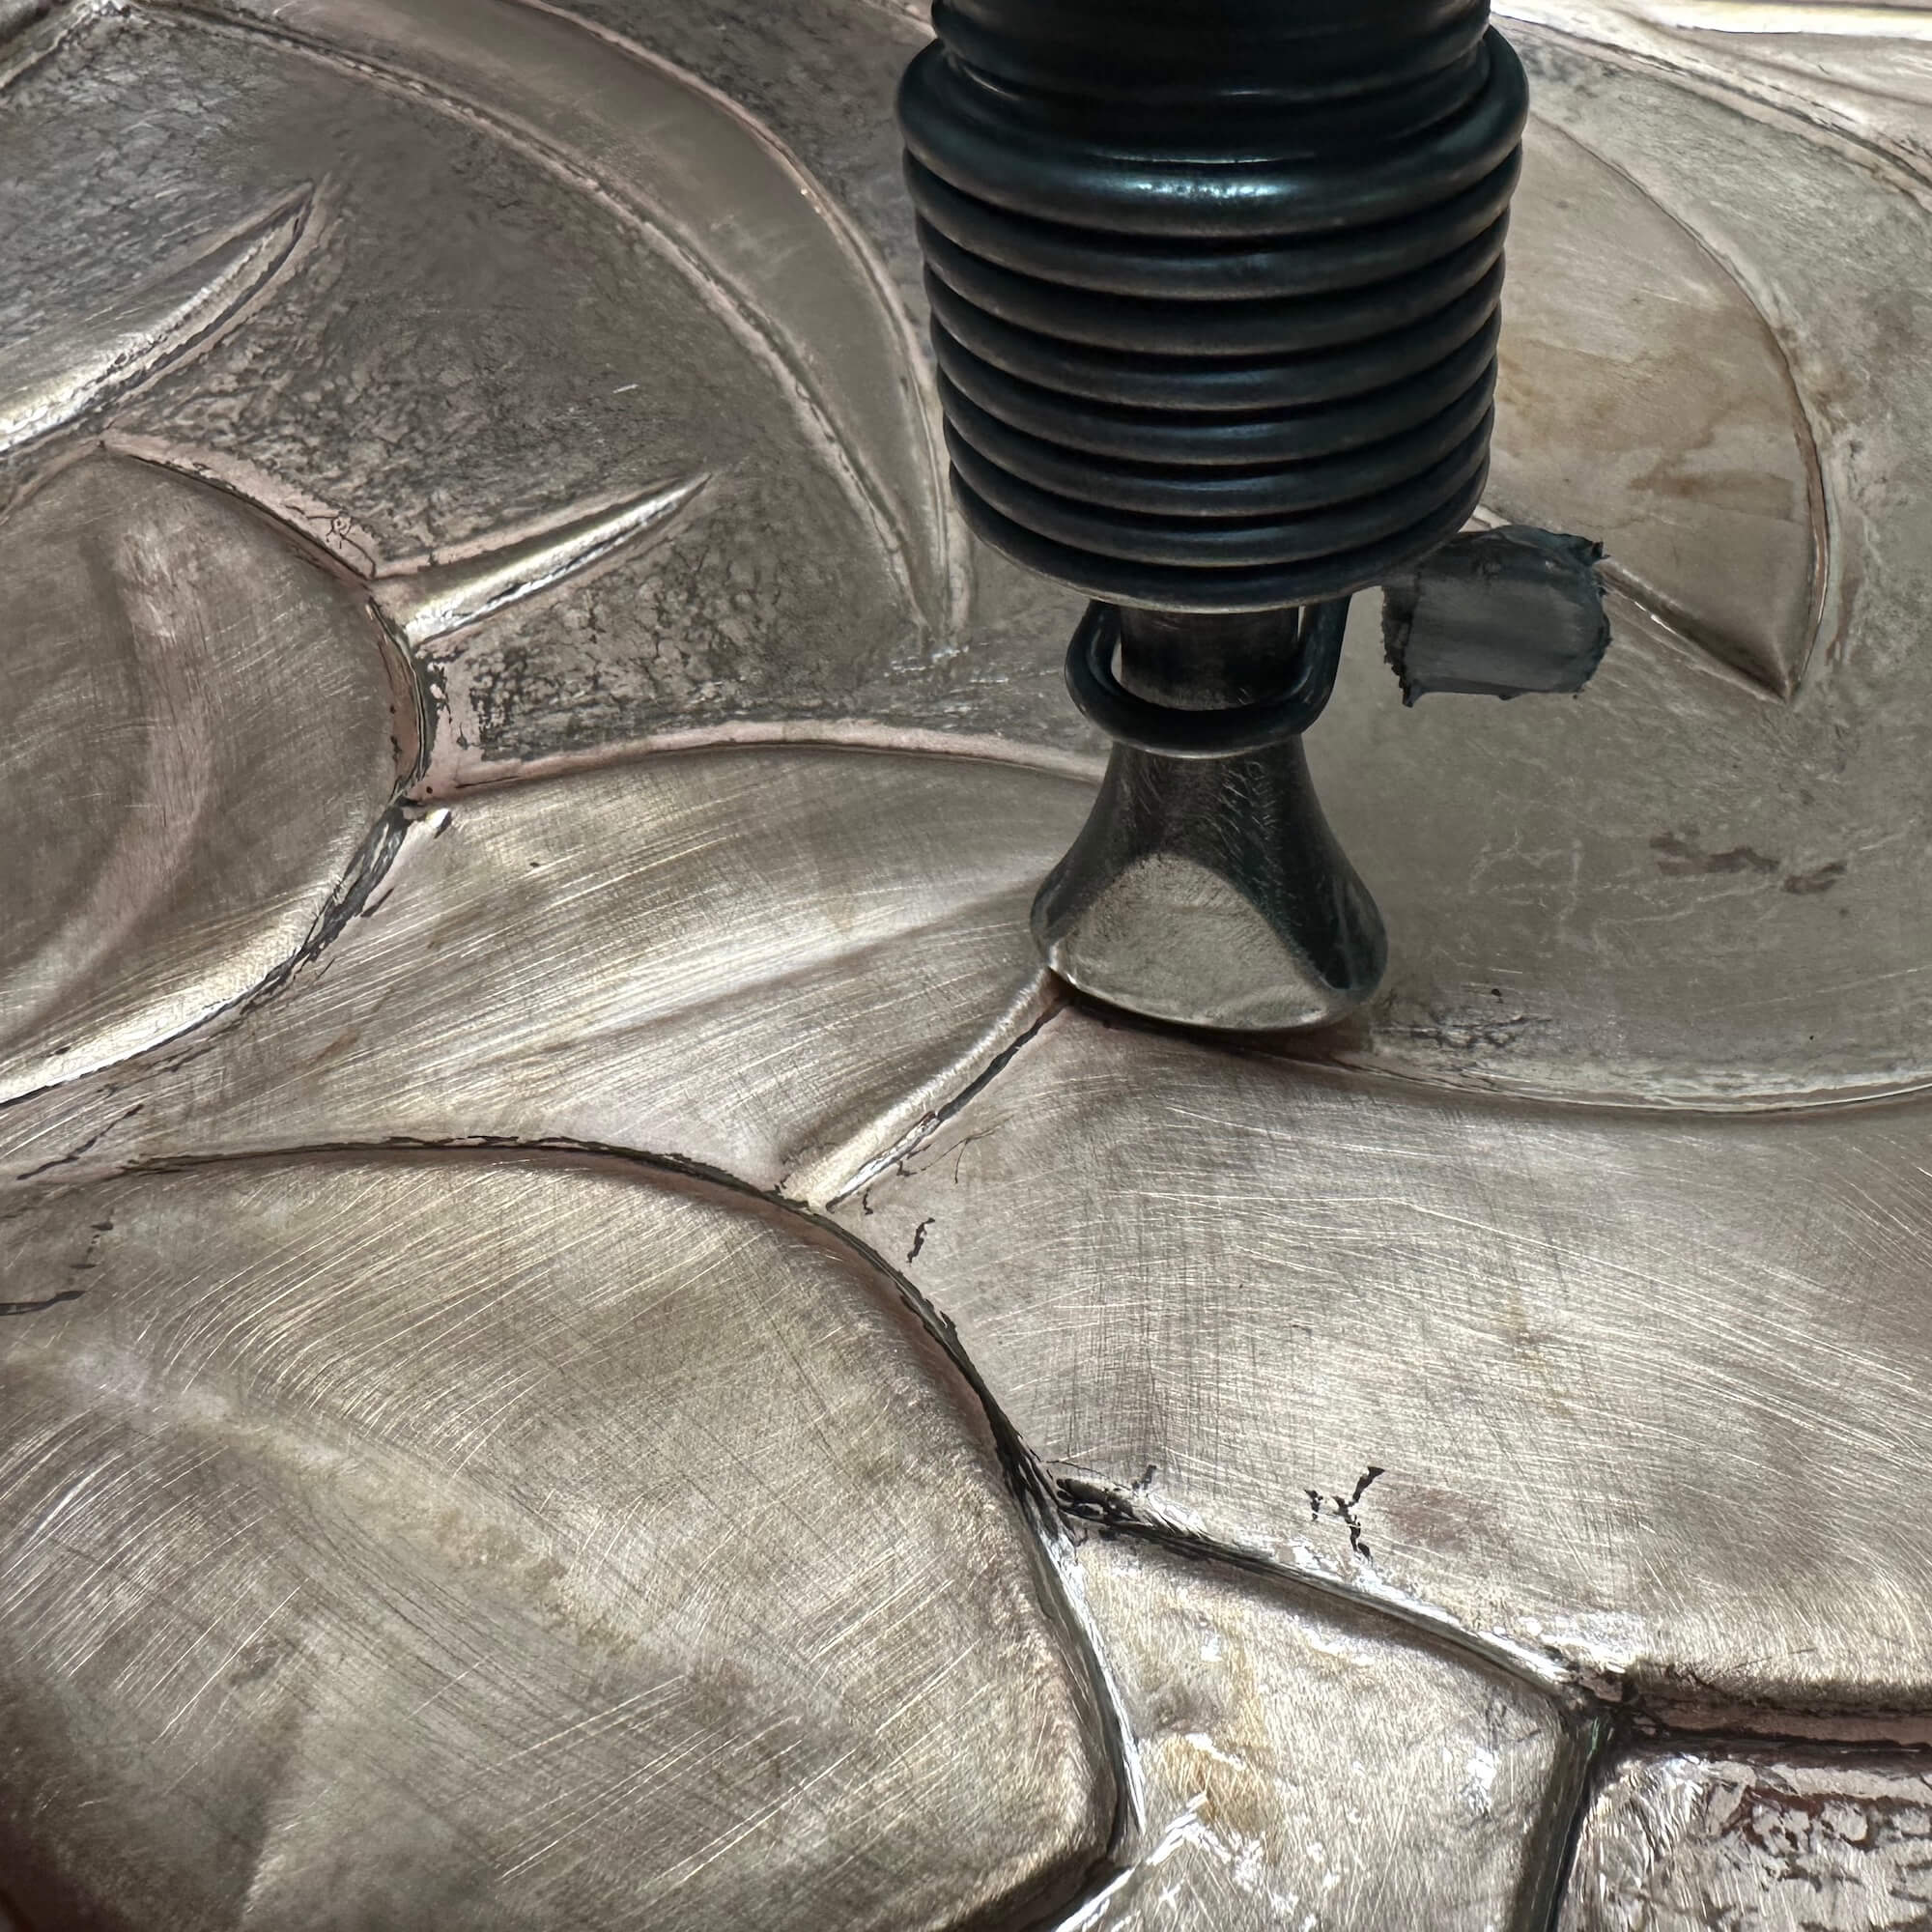
The relief was created gradually using handheld hammers, punches and pneumatic tools. The surface depth was forged by pushing the metal from both sides, rather than by adding or removing material, softening the copper with heat between each stage to maintain pliability. The resulting texture is a direct record of thousands of individual strikes, capturing the story its creation within the metal itself. The raised relief is about 1/4 inch deep.
Please note, this artwork is intended for indoor display only because the internal wooden components are not suitable for moisture or outdoor conditions.
FINISH AND PATINA
The rich, dark brown surface was achieved through a multi-step oxidation process, using a blend of salts and acids to accelerate the copper’s natural aging. This chemically bonded patina remains a living finish that will subtly deepen and mature over the years. To protect the surface, the sculpture is finished with Renaissance Wax, a premium sealant trusted by the British Museum for historical artifacts. This museum-grade wax slows further oxidation without the risk of yellowing or cracking associated with synthetic clear coats.
DIMENSIONS AND HANGING
STEP BY STEP INSTALLATION
Your artwork ships with a french cleat style wall hanger rated to hold well beyond the sculpture’s weight. The hanger is already attached to the back of the sculpture, and a matching wall bracket is included for installation. Bear Claw screws are provided and work in drywall, plaster, wood and some masonry. Bear Claws do not need to be screwed into a wall stud, they can support the sculpture when screwed into drywall alone. Having said that, if you can hit a stud with 1 one of your screws that's always a good idea. Other screws or anchors can be used if your wall requires them.

TOOLS YOU NEED
- Tape Measure
- Pencil
- Level
- Drill
- 3/16" drill bit
- Phillips screwdriver
NOTES
- No stud required
- Hardware included
- Use larger holes first
- Check level often
- Avoid over-tightening
- Hand tighten only
Mark wall bracket location
Decide where you want the top edge of the artwork to be on the wall. Measure down from that point to the hanger's location; this measurement is provided with your artwork. Mark this spot on the wall with a light pencil line.
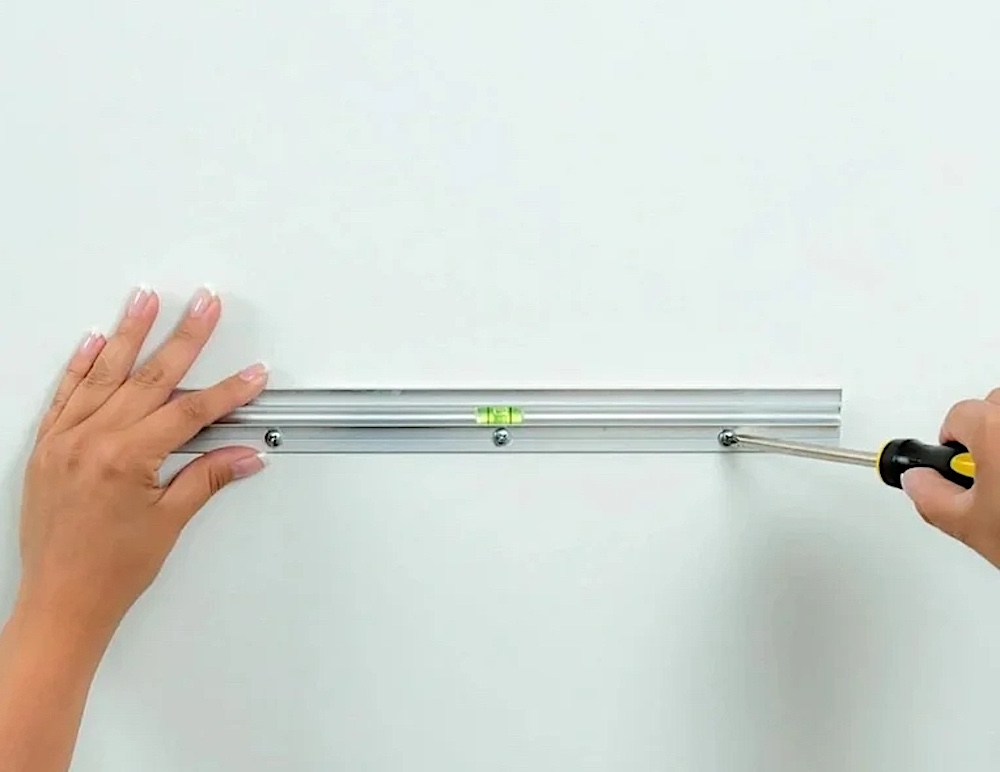
Install the next screws
Loosen the center screw slightly so the bracket can swing aside. Drill 3/16 inch pilot holes at the new marks. Swing the bracket back into position and keep the level on top. Insert the next two screws and tighten until they are barely snug, but not fully tight.
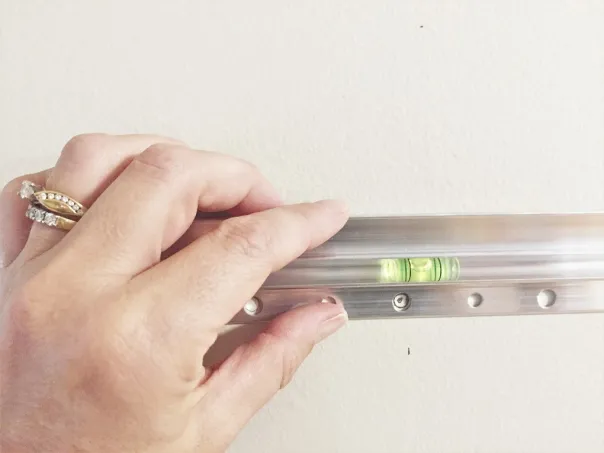
Mark the first hole
Hold the bracket so the bottom edge rests on the pencil line and center it where you want the artwork to hang. Mark the center of one of the large holes near the middle of the bracket.
Level and tighten
Tighten the screws one at a time while continuously checking the level. The wall bracket can shift slightly during the final turns of a screw. If the bracket moves out of level, loosen the screws slightly, pivot the bracket back to level, and retighten.
Install the first screw
Drill a 3/16 inch pilot hole at the mark you just made. Drive the first screw in with a handheld screwdriver, but do not tighten it fully. Leave it snug enough to hold the bracket while still allowing it to pivot for leveling.
Test hang the artwork
Hang the artwork once the first three screws are tight to confirm that it sits level. Small adjustments can still be made by loosening the screws and re-leveling the bracket.
Mark the next holes
Place a level on top of the bracket and pivot it until it is level. While holding the bracket level, mark the centers of two additional large holes near each end of the bracket. Using the larger holes allows for easier adjustment in later steps.
Add extra screws
After the bracket is level, additional screws can be installed in the remaining holes for added support. If none of your first three screws are anchored to a wall stud, it is recommended to add at least one more. If you are able to hit a wall stud with one of your screws, then three screws are likely sufficient.
TOOLS YOU MAY NEED
- Tape Measure
- Pencil
- Level
- Drill
- 3/16" drill bit
- Phillips screwdriver
NOTES
- No stud required
- Hardware included
- Use larger holes first
- Check level often
- Avoid over-tightening
- Hand tighten only
Mark wall bracket location
Decide where you want the top edge of the artwork to be on the wall. Measure down from that point to the hanger's location; this measurement is provided with your artwork. Mark this spot on the wall with a light pencil line.
Mark the first hole
Hold the bracket so the bottom edge rests on the pencil line and center it where you want the artwork to hang. Mark the center of one of the large holes near the middle of the bracket.
Install the first screw
Drill a 3/16 inch pilot hole at the mark you just made. Drive the first screw in with a handheld screwdriver, but do not tighten it fully. Leave it snug enough to hold the bracket while still allowing it to pivot for leveling.
Mark the next holes
Place a level on top of the bracket and pivot it until it is level. While holding the bracket level, mark the centers of two additional large holes near each end of the bracket. Using the larger holes allows for easier adjustment in later steps.
Install the next screws
Loosen the center screw slightly so the bracket can swing aside. Drill 3/16 inch pilot holes at the new marks. Swing the bracket back into position and keep the level on top. Insert the next two screws and tighten until they are barely snug, but not fully tight.
Level and tighten
Tighten the screws one at a time while continuously checking the level. The wall bracket can shift slightly during the final turns of a screw. If the bracket moves out of level, loosen the screws slightly, pivot the bracket back to level, and retighten
Test hang the artwork
Hang the artwork once the first three screws are tight to confirm that it sits level. Small adjustments can still be made by loosening the screws and re-leveling the bracket
Add extra screws
After the bracket is level, additional screws can be installed in the remaining holes for added support. If none of your first three screws are anchored to a wall stud, it is recommended to add at least one more. If you are able to hit a wall stud with one of your screws, then three screws are likely sufficient.
PRO-TIPS
Utilize "Wiggle Room": Most brackets have holes larger than the screw diameter. Loosen all mounting screws slightly—just enough so the bracket can move but won’t fall—then pivot it to the level position and retighten while holding it firmly in place.
Compensate for Uneven Walls: If the wall isn't perfectly flat, the bracket may bow or tilt as you tighten the screws. To fix this, loosen the screws slightly and slide a shim—such as a plastic spacer, a metal washer, or even a small piece of cardstock—behind the bracket to fill the gap before retightening.
Widen Existing Holes: If the bracket is stuck because a hole was drilled slightly off, use a round metal file to slightly elongate the mounting hole into an oval shape. This allows for a few millimeters of "post-installation" adjustment.
Compensate for Visual Illusions: Sometimes a perfectly level bracket looks "crooked" because the ceiling or a nearby mantel isn't level. In these cases, it is often better to measure an equal distance from the ceiling or mantel on both sides so the artwork appears level to the eye, even if the bubble level says otherwise.
CLEANING AND CARE
OVERVIEW
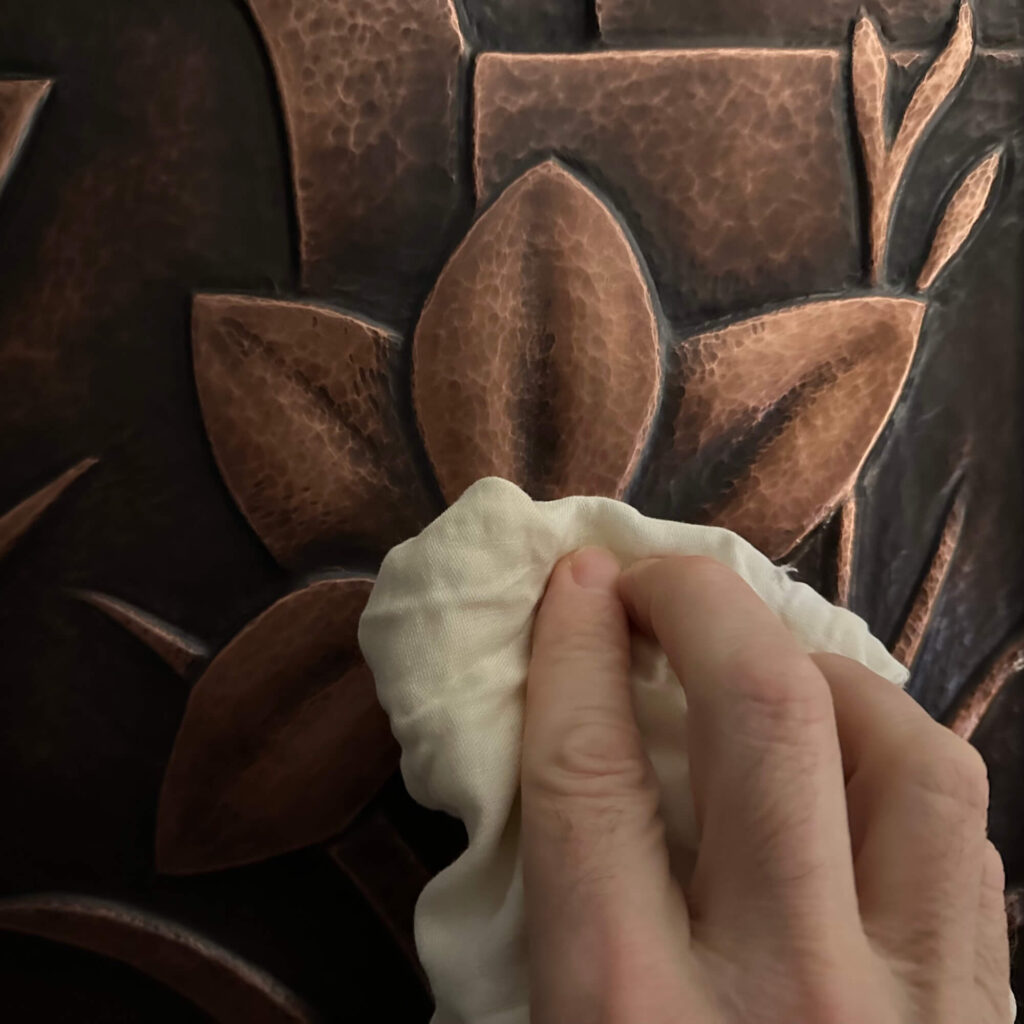
This wall sculpture requires minimal maintenance. It is sealed with wax, so light dusting with a soft, non-abrasive cloth is usually sufficient. A thin recoat of wax such as Renaissance wax or another paste wax can be applied occasionally to refresh the surface and slow further oxidation.
MAINTENANCE

Dusting
Use a soft, dry microfiber cloth or scratch-free duster to remove dust from the surface.

Reapply Wax (optional)
You can reapply a thin coat of a paste wax like Renaissance Wax if the surface begins to look dull.
NOTES

Avoid Moisture
Do not hang in areas with high humidity (bathrooms) or where it may be exposed to water.

Handling
Always handle with clean, dry hands or gloves to prevent oils from affecting the finish.

Display Indoors
Maintain stable indoor temperatures and low humidity levels for long-term preservation.

No Cleaners or Abrasives
Do not use household cleaners, polishes, cleaning sprays or abrasives.
HOW TO APPLY WAX
The sculpture is sealed with Renaissance Wax — a museum-grade wax developed by the British Museum specifically for preservation. It provides a protective barrier that dramatically slows the natural evolution of the patina (which will subtly continue to evolve over years and decades), without the risk of yellowing or cracking associated with synthetic clear coats.
Many collectors appreciate the natural evolution of a copper patina, which adds to the surface variation and long-term character of the metal.
You can reapply a thin coat of Renaissance Wax or another paste wax (like Johnsons) every 12 to 18 months if desired, or if the surface begins to look dull.
- Apply a small amount of wax with a soft, lint-free cloth.
- Rub lightly in circular motions to cover the surface.
- Allow the wax to dry for a few minutes. The surface will be hazy.
- Buff with firm pressure using a clean, dry cloth until the haze is rubbed out and the surface has an even, soft sheen.
SHIPPING AND RETURNS
FREE U.S. SHIPPING!
Free shipping is available within the United States, including Alaska and Hawaii. Free shipping does not include U.S. territories such as Puerto Rico, the U.S. Virgin Islands, Guam, American Samoa, or the Northern Mariana Islands.
Orders ship only to the address entered at checkout. Address changes after purchase are not accepted. If a change is needed, the order must be canceled and placed again with the correct address.
Secure Delivery & Signature Requirement
All orders require an adult signature (21+) upon delivery. A delivery signature serves as proof of delivery and completion of the shipment.
This requirement helps prevent theft, confirms delivery to a person, and provides a record for insurance and delivery verification.
Order Processing & Transit
Most orders ship within 3-5 business days. Some pieces may take longer if a custom box or crate is required to ensure maximum protection during transit.
Orders usually ship via UPS Ground, FedEx Ground, or USPS. Transit time depends on your distance from Raleigh, North Carolina.
Orders may be held for verification before shipment. Additional information may be requested to confirm the order.
Expedited Shipping: Contact us before placing your order if you need expedited shipping. Next Day and Two-Day Air service may be available for an added charge.
International Shipping: Contact us before ordering for international shipping. Customs rules, duties, tariffs and insurance must be reviewed in advance.
RETURN POLICY
If a piece does not work in your space, you may return it for a refund.
Returns are accepted within 14 days of delivery, only if the artwork is returned and received in original condition. Original condition means unused, unaltered, and free of damage, with all original packaging and materials. We do not issue refunds without return of the item.
Contact us before shipping the return so we can provide the correct return address and confirm acceptance.
The buyer is responsible for return shipping. The artwork must be packed securely to prevent damage in transit. If the piece arrives damaged due to poor packaging, the refund may be reduced or declined.
Once the return is received and inspected, refunds are processed within 3 to 7 business days. We will contact you when your return has been received.
If Your Order Arrives Damaged
Please inspect your artwork as soon as it arrives. Take clear photos of the box before opening if there is visible damage.
Take pictures of the packing materials and any damage to the artwork. Damage must be reported within 48 hours of delivery.
Keep all packaging and do not attempt repairs. Contact us right away with the photos so a repair, replacement, refund or shipping claim can be arranged.
Customer Support
If there is any issue with your order, contact us so we can resolve it. We answer customer service requests within 1-2 business days and are happy to help.
FREE U.S. SHIPPING!
Free shipping is available within the United States, including Alaska and Hawaii. Free shipping does not include U.S. territories such as Puerto Rico, the U.S. Virgin Islands, Guam, American Samoa, or the Northern Mariana Islands. Contact us before ordering if you are located in one of these areas. An added shipping charge will apply.
Most orders ship within a few business days. Some pieces may take longer if a custom box or crate is required.
Orders usually ship by UPS Ground, FedEx Ground, or USPS. Transit time depends on your distance from Raleigh, North Carolina. As an example, UPS Ground to California often takes about 4 to 6 business days in transit, plus order prep time before shipment.
Expedited Shipping: Contact us before placing your order if you need expedited shipping. Next Day and Two-Day Air service are available for an added charge. Expedited shipping often ranges from about $200 to $500 depending on size, weight, and destination.
International Shipping: Contact us before ordering for international shipping. Customs rules, duties, tariffs and insurance must be reviewed in advance. An added shipping charge will apply. Shipping costs can be high, and some destinations have limits or added fees for art.
If Your Order Arrives Damaged: Please inspect your artwork as soon as it arrives. Take clear photos of the box before opening if there is visible damage. Take pictures of the packing materials and any damage to the artwork. Keep all packaging and do not attempt repairs. Contact us right away with the photos so a repair, replacement, or shipping claim can be arranged.
RETURN POLICY
Returns are accepted within 14 days of delivery if the artwork is in original condition and packed in the original materials.
If a piece does not work in your space, you may return it for a refund. Contact us before shipping the return so we can provide the correct return address and expect the package.
The buyer is responsible for return shipping. The artwork must be packed securely to prevent damage in transit. If the piece arrives damaged due to poor packaging, the refund may be reduced or declined.
Once the return is received and inspected, we will contact you and issue a refund if the artwork is still in original condition.
Want this artwork in a different size or material?
If you like this piece but need a different size or metal, that can usually be done. Many commissions start with an existing design and are adjusted to fit a specific wall, room or project. Typically, these designs can be made in copper, bronze, brass or aluminum. Steel or stainless steel can sometimes be used as well, though it depends on the design and may require a simpler approach.
Share a few details in the form about what you are looking for. You'll be contacted by email to talk through the idea, answer questions and provide a quote with an estimated build and delivery time.
Want to commission a custom piece of art?
Custom metalwork built to order. Projects range from original artwork to purpose-built functional pieces, designed around your space, materials and specifications. We can help with everything from early concept to final fabrication.
Are You a Designer, Gallery or Wholesaler?
Trade pricing may be available for interior designers, builders, galleries and wholesale partners. Discounts depend on order size, project scope, and whether work is custom or in stock. Reach out with a description of what you need and your timeline.